ThinkingCog

Articles written by Parakh Singhal

Raspberry Pi and Passwordless SSH Login

In any modern operating system when you login, you are greeted with a login screen asking for your credentials. If you are the only user using the system, you may be spared the labor of filling in the username, but a password still will be required to login.

We can forgo the exercise of filling the password by virtue of asymmetric encryption. Asymmetric encryption makes two types of keys available – private and public. As the name suggests, public key can be made available to the public while the private key remain with the system which needs to do the authentication. In our case we will be logging into Raspberry Pi using SSH and will use key based authentication mechanism to login, forgoing the need of any password. Pi will send the public key over the wire to the host operating system running Putty which will then compare it with the companion private key. If a match is found, the user authenticates successfully. Note that the private keys never travels over the wire.

We need the following to make this a possibility:

1. PutTTYgen: To generate a pair of keys,

2. Pageant: To run in the background and maintain availability of the private key

Both the aforementioned software components come bundled with Putty, so if you have Putty installed, there’s a good chance that they are already installed on your system.

Generating a key pair

Open PuTTYgen and click on the “Generate” button generate a pair of keys. Make sure that “RSA” algorithm is selected with key strength of 2048 bits. Once generated, use the in-built facility and save the public and private keys to the folder which you consider save enough to retain your private key for future reference. DO NOT SHARE YOUR PRIVATE KEY WITH ANYONE.

Generate key pair with PuTTYgen

Now, the most important part. If you look at the format of the public key saved by PuTTYgen, you will find that it spawns multiple lines. It is un-usable in majority of the systems and exists only for reference. We need to copy the public key in the large “Key” window, which specifically makes the key properly formatted for use in OpenSSH based authentication systems.

02 PuTTYgen Keys Window


Copy the key into a simple text file and name it “authorized_keys” and remove the txt extension. This is the file that will be used by Raspbian Stretch operating system without any further configuration.

Now run the Pageant agent in your Windows system and add the private key generated previously. The private key should have an extension “ppk”. Pageant agent will run on the host operating system where from you want to connect and will keep the private key handy.

03 Pageant

Configuring Raspberry Pi

Now let’s configure our Raspberry Pi to accept key based authentication. Login the usual route with your username and password and follow the steps:

1. Create a .ssh folder (hidden folder) in the home directory of the user for whom you want to use key based authentication.

2. Copy over the public key (NOT PRIVATE KEY) that you generated previously and named “authentication_keys” to the folder. I used a thumb drive for the purpose.

3. Secure the key file and the .ssh folder. Only the user meant to use the key based authentication should be able to access the key file in read-only and executable capacity. The .ssh folder should be off limits to everyone else.

4. Restart the ssh service.

5. Logout and log back in with the username for which you enabled the key based authentication.

mkdir .ssh
sudo mount /dev/sda1 /mnt/usb
cp /mnt/usb/authorized_keys .ssh/
sudo chmod 500 .ssh/authorized_keys
sudo chmod 700 .ssh
ls -al /home/parakh .ssh/authorized_keys
sudo systemctl restart ssh


04 Commands Cropped


All this was made possible by the magic of asymmetric encryption.

05 Login Cropped

The good thing about this scheme is that if, for some reason the public key on Raspberry Pi gets corrupted, or the Pageant is not running in the background on the host operating system, then you get offered the good-old password challenge. I purposely exited the Peagent and as expected Pi challenged me with a password corresponding to my account.

06 login using password cropped

References:

1. Passwordless SSH access

ASP.Net Core MVC on Raspberry Pi

Key Takeaway:

.Net Core allows for a cross platform operation of applications on supported hardware and software. This extends to ASP.Net Core. In this post I am going to show how to run ASP.Net Core in self-contained deployment mode on Raspberry Pi 3.

Read On

In my last post I showed how to run a .Net Core console application in Raspberry Pi. In this post I am going to show how to run an ASP.Net Core Web application on Raspbian Stretch operating system using Raspberry Pi 3 hardware. Before you do that make sure that you have assigned a static IP address to Pi. You can learn how to do that in one of my previous post.

First create a new ASP.Net Core Web application project in Visual Studio which does not rely on any kind of authentication.

ASP.Net Core Web App

ASP.NET Core Web Application

02 No authentication

Web application with no authentication

Since the aim of this post is learn how to run an ASP.Net Core application on Pi, let’s keep things simple. We will not do any modification to any of the pages in the application. Build and run the application locally to make sure that it works.

03 ASP.Net Core app running

Web application running out of the box

The application is running locally using IIS Express and listening at the address mentioned in launchSettings.json file under Properties in the project hierarchy. When it comes to hosting the application in Pi, we need to makes sure that the application listens at the desired IP address and port. This is accomplished using the “UseUrls” method in Program.cs file. The “UseUrls” method specifies the URL scheme that the web host will use to listen to the incoming requests. Since we will be using the Kestrel web server via terminal in Pi, it is important that we change the port in the Program.cs file, as shown in the image. Make sure that the port that you assign is not in use by some other app in Pi.

04 Program.cs file

Change the port to something that is available in Pi

Now publish the entire application for linux-arm combination using the following command:

dotnet publish -r linux-arm


Now copy the entire publish directory to Pi. This will give us not only our application, but also the server infrastructure to serve the application. Make sure that you have the appropriate permission to run not only the application, but also the Kestrel server under your account. You can use the following command to recursively allow your account have the execute permission on all the assemblies inside the publish folder.

chmod –R 755 publish


Once that is done, execute the application:

05 Kestrel running

Kestrel running

Now hop into your browser in your computer and use the IP address of your Pi in conjunction of the port on which the Kestrel server is listening.

06 Application running locally

ASP.NET Core Web application being served by Pi

Happy exploration.

Running a .Net Core Application on Raspberry Pi

Key Takeaway

Raspberry Pi is an experimenter’s dream come true. It offers light to medium computing power in a small form factor with all the bells and whistles like Wi-Fi, Ethernet, Bluetooth, USB 2.0 ports etc. Further augmenting a tinkerer’s abilities are the software capabilities, which now stand further extended due to the introduction of .Net Core which allow you to leverage your existing background with Visual C# and run code on ARM architecture. In this post we will take a look at all the steps that one has to perform to run code created using Visual C# and targeting .Net Core on a Raspberry Pi 3.

Read On

.Net Core is a cross platform offering from Microsoft which allows you to run your C# code on multiple hardware (x86, x64, ARM etc.) and software platforms (Windows, Linux and macOS). Of course, it does not provide universal coverage, and at the time of writing this post, industrial grade long-term support versions of operating systems are being targeted with higher priority by Microsoft. It is natural, after all those are the operating systems that organizations would be using to run their applications.

But there’s something about frugal engineering and Raspberry Pi is a prime example of that. With support from the community, it is possible to have the code made targeting .Net Core, be run on Raspberry Pi 3. Here are some of the points that you may want to read before going any further:

1. Note that the compilation targeting ARM hardware (ARM32) for both Linux and Windows software platforms are not being officially supported by Microsoft. So, have justified expectations and be prepared to get your hands dirty with some virtual dirt. See their official statement here.

2. At the time of writing this post, it is only possible to run .Net Core code on Raspberry Pi 2 and 3, and not on Pi Zero. This is because .Net Core at the moment targets ARMv7 instruction set and above for ARM architectures. Raspberry Pi 3 uses a Broadcom BCM2837 chip which uses ARMv8 instruction set, while Raspberry Pi Zero uses BCM2835 chip which uses ARMv6 instruction set. See the official statement here.

3. There is no Software Development Kit (SDK) available at the moment that helps you develop software on Raspberry Pi for Raspberry Pi, so you will have to develop your code on a supported development environment and then copy over to Pi for execution.

Alright, if you have made this far, I am assuming that you want to give it a go.

Creation of a console application

First let’s develop our application and since this will be the first time we will be running a .Net Core project in Raspberry Pi, let’s keep things simple. Fire up your Visual Studio and then create a new console application project. I named mine as “DotNetCoreOnRPi”. Just so that we can easily identify that the things are working as desired, add a line in your main program:

Console.WriteLine("This program was created in Windows 10, but running in Raspberry Pi. :)");

Save your program and open the developer console and navigate to the folder containing your project.

Any application targeting .Net Core can be executed either as a self-contained application (Self-contained deployment) packing all the assemblies that its execution depends upon, or as an application depending on the .Net Core framework (Framework-dependent deployment). You can read more about that here. We will publish our application as a self-contained application on Raspberry Pi.

Self-contained deployment

In order for the application to execute in a supported operating system, it still needs some functionality that is supported by the targeted operating system. Raspbian Stretch operating system, the official operating system supported by the Raspberry Pi Foundation, comes missing just one essential package. Run the following code to install the “libunwind” package.

sudo apt-get install curl libunwind8 gettext

Once done we need to return to our developer prompt and publish the project targeting the “linux-arm” platform by using the following line of code:

dotnet publish -r linux-arm

This will create a folder in the bin/Debug/netcoreapp2.0 named “linux-arm”. Within the linux-arm folder will be a folder named “publish”.

Copy the entire publish folder at a suitable location in your Pi. Open a terminal window and navigate to the publish folder. Make sure that you have the appropriate permission to execute the application. You can use the following command to grant the execution permission:

chmod 755 ./DotNetCoreOnRPi

Then execute the application by using the command:

./DotNetCoreOnRPi


.Net Core on Raspberry Pi

For now, all the official and un-official documentation points to the fact that framework-dependent deployments are not supported. Let’s hope that Microsoft starts supporting Arm32 builds officially and we can reduce the size of our deployments by relying on the .net core framework available on a system-wide basis.

Installing Plex Media Server on Raspberry Pi


Key Takeaway

In my last post I wrote about how to install and operate Raspbian operating system in a headless mode using a static IP address with the intention of starting and using services that require a static IP address. Plex Media Server is one such service which can run fruitfully on Raspberry Pi 3 Model B and use the hardware to the fullest. In this post I will demonstrate how to install Plex Media Server on your Raspberry Pi and consume media from it.

Read On

Plex Media Server as the name suggests is a media server and can serve various types of media on a variety of devices. The basic premise behind the server is to provide media to the consuming point per the capabilities of the client. For example, if you have a video file in mkv (Matroska) format and you want to see the video on an iPad, you cannot do until you transcode the file into a format that is compatible with iPad. In this case it will be mp4. Plex provides on the fly transcoding capabilities, so you do not have to wait for the entire video file to be transcoded and then see it. It instead, transcodes the file on the fly and streams it to your device.

To get started, make sure that you have the latest version of Raspbian operating system installed and Pi is configured to communicate to your router using a static IP address. Before we start, let’s make sure that the system is having the latest packages installed using the following commands:

sudo apt-get update sudo apt-get upgrade

Update command brings information about the newer versions of the packages installed in the operating system and are available in the repository, while upgrade actually downloads the packages and installs them. Please note that upgrading the packages can download a significant amount of data, so if you are on metered bandwidth, beware.

After this we need to ensure that the traffic between Pi and clients travel on an encrypted channel. For that we need to make sure that the “https” package is installed and running. Run the following command:

sudo apt-get install apt-transport-https


Plex is not officially supported on Pi, so we will download the port created by the good folks at dev2day. The first step to do that is to add the public key corresponding to the package. Run the following command to get it done:


wget -O - https://dev2day.de/pms/dev2day-pms.gpg.key | sudo apt-key add -


01 Installation of Key - Cropped


I tried searching for the Plex package made for Stretch, but was not available at the time of writing this post/. So we will install the one available for Jessie. Add the package to the list of packages by running the following command:

echo "deb https://dev2day.de/pms/ jessie main" | sudo tee /etc/apt/sources.list.d/pms.list


02 Correct - Inclusion in the package List - Cropped


Now update the package list so we are able to pull in the latest Plex Media Server package:

sudo apt-get updateNow get and install the package: sudo apt-get install -t jessie plexmediaserver


03 Updating the packages - Cropped


04 Installation of Plex - Cropped

We need to change the default user under which the PMS is supposed to run from “plex” to “pi”:

sudo nano /etc/default/plexmediaserver.prev


05 Change of user - Cropped


Now restart the plex service and reboot Pi:

sudo service plexmediaserver restart sudo reboot

 Once Pi comes up, go to the static IP address at which Pi operates appended by “:32400/web” and it will take you to the welcome screen. From there on you can register for an account and add media to your library. Note that creating and using an account is not necessary to use Plex.

06 Plex Installed - Cropped

Welcome to Plex Media Server on Raspberry Pi.

How to Setup Raspberry Pi Without a Monitor and Keyboard and Ethernet Cable (Headless Mode)

Key Takeaway:

Installation of the Raspbian operating system on a Raspberry Pi requires an external keyboard and mouse for providing input and an external HDMI monitor to see what’s happening. In this post, we will learn how to configure the boot media, so that we are able to leverage our existing Windows hardware for the installation and subsequent operations without requiring an external keyboard, mouse and a monitor, also known as the “headless mode”. We will also be connecting our Pi to our Wi-Fi network without the any intermediate use of an Ethernet cable and will allocate it a static IP address.

Read On:

Raspberry Pi is a single board computer that offers a fun way to learn about Linux and is capable of handling various projects that require light to medium computing power. It is one of the most favored platforms for prototyping an IoT project.

Installation of most of the Raspberry Pi compatible operating systems at the time of writing this post requires the presence of an external USB keyboard and mouse to provide input and an HDMI capable monitor to receive video feed of what’s happening. These requirements prove to be a bit of a hurdle in getting Raspberry Pi up and running. Fortunately, things are improving and creators of Linux distros are making sure that there are ways to configure Raspberry Pi to facilitate a headless install, configuration and subsequent operation with the use of existing integrated hardware like a pc or a laptop.

In this post I will demonstrate how to install and operate Raspbian operating system in a truly headless fashion using your existing Windows PC hardware. We will accomplish the following:

1. Enable SSH for logging into Pi after the first boot.

2. Connect to existing Wi-Fi with the help of supplied credentials.

3. Have a static IP address, so in future we will have the ability to reliably connect to Pi at a known address and enable us to operate services like a NAS or a media server.

4. Enable VNC server on Pi so we can remotely login into Pi and use the convenience of GUI to get things done.


To accomplish all that we need the following hardware and software:

1. Raspberry Pi 3 Model B.

2. A Windows or Linux enabled laptop or a desktop computer to download the Raspbian image to.

3. A micro-SD card to install Raspbian image onto.

4. A micro SD card reader-writer.

5. Image of the latest version of Raspbian operating system (with desktop).

6. Etcher to transfer the Raspbian operating system onto the micro-SD card.

7. Notepad++ to create configuration files. Please note that Windows Notepad won’t cut it.

8. Advanced IP Scanner to scan the network to note the subnet and ip addresses of various devices.

9. Putty to SSH into Pi after the installation of the operating system.

10. VNC viewer to remotely login into Raspbian operating system.

I am writing this post assuming that you are working with a Windows enabled computer.

Head over to RaspberryPi.org and download the latest version of Raspbian operating system with desktop. Now we need to transfer this operating system to the micro-SD card.

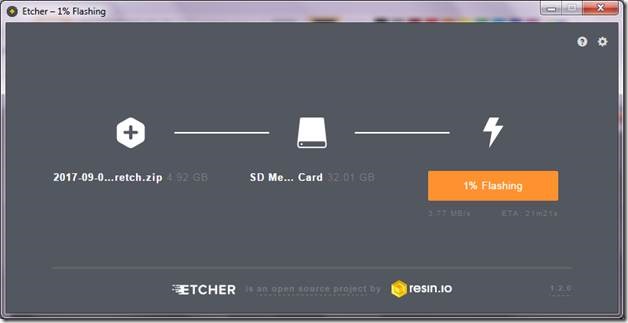
To transfer the operating system onto the micro-SD card we will be using Etcher from resin.io. Brilliantly simple to use and just works with a wide variety of image formats. Etcher can directly work with zipped images, eliminating the need to unzip the downloaded images. You can also download the portable version and use it without installing it.
clip_image002


Figure 1 Etcher in action

Once you have flashed and validated the micro-SD card with the operating system, prepare to perform some steps that are going to make the entire installation and subsequent operation a headless one. If you open the card in Windows Explorer, then you will be able to access the boot folder containing a few files. Since Windows does not recognize EXT4 file system, you will not be able to see or access any other of the partition on the card or any folder or file contained therein.

Enabling SSH

To enable headless configuration and operation of Raspberry Pi, it is essential that we have some mechanism to login into our Pi. SSH enables that. By default, SSH now comes disabled in Raspbian Stretch operating system. But it can be easily enabled by introducing a file named “ssh” with no extension. You do not have to bother putting anything in the file as just the presence of the file will indicate your intention to enable SSH in Raspbian at the first and subsequent boots.

clip_image004


Figure 2 Insert a blank text file SSH excluding any extension

Configuring Wi-Fi

One of the changes introduced in Raspbian Stretch was the ability to put “wpa_supplicant.conf” file into the boot folder which at first boot could be used to configure network settings. So open up your Notepad++ and open a new text file. Make sure to change the “End of Line” setting set to “UNIX” (Edit->EOL Conversion). If you do not change this setting, Notepad++ will use Windows end of line settings and network settings will not take effect.

clip_image006


Figure 3 Change the EOL setting in Notepad++ to UNIX when handling any file for Raspbian

Insert the following settings into the file:

   1: country=in
   2: update_config=1
   3: ctrl_interface=/var/run/wpa_supplicant
   4:  
   5: network={
   6: scan_ssid=1
   7: ssid="MyNetworkSSID"
   8: psk="MyNetworkPassword"
   9: }

Change the country entry to the applicable one. Similarly use the SSID of your Wi-Fi network and corresponding password.

Save the text file in the boot folder and name it “wpa_supplicant.conf”. The significance this file is that it serves the configuration to the supplicant (basically hardware or software that connects to a network. More info is available here), and after the first boot gets copied into the “/etc/wpa_supplicant” directory for operational purposes. You can read more about this here (in context with Raspbian Stretch).

Now that we have taken care of SSH and Wi-Fi settings, let’s get ourselves a static IP address where we can SSH to. Boot up your Pi.

Configuring for a static IP address

Now to assign a static IP address to our Pi, we need to login into Pi at the IP address that gets allocated to our Pi at its first boot. We will use that IP address in Putty and start our SSH session and carry out further configuration to work with a static address.

We can find the IP addresses allocated to various devices with the help of the Advanced IP Scanner tool available from Famatech. The best thing about this tool is that you can run this tool without installing it, in portable mode. Boot up your Pi and then run this tool to see the IP address allocated to the device.
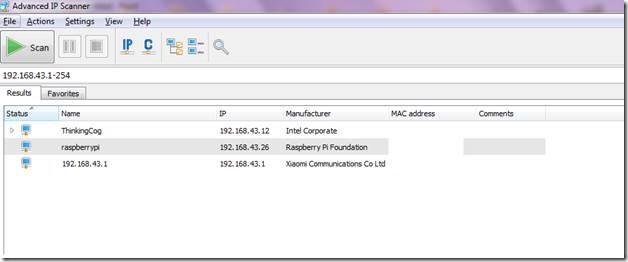
clip_image008


Figure 4 Raspberry Pi connected to Wi-Fi with a random IP address allocated

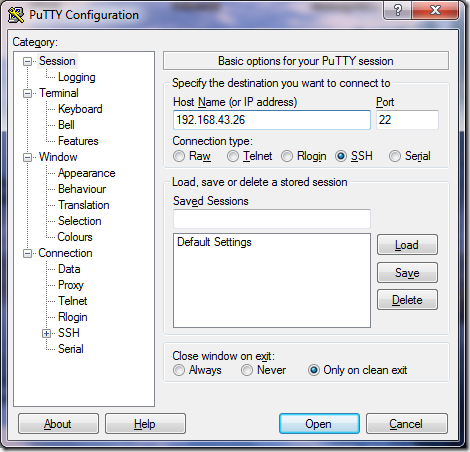
Once you have noted down the IP address allocated to Pi, use Putty or your favorite SSH tool to login into Pi.
clip_image009


Figure 5 SSH into Pi using the allocated IP address

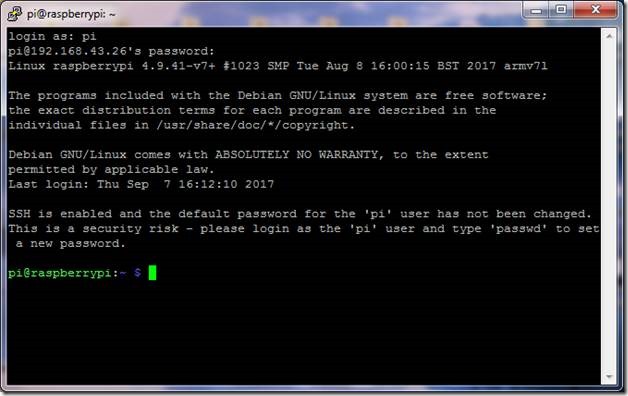
The default username and password to be used for logging into Pi are “pi” and “raspberry” respectively. After logging into Pi via SSH, use the following steps to configure Pi to have a static address.
clip_image011

Figure 6 Successful SSH login

Now give the following command to know about the gateway (your router in this case), just to be sure that your Pi is communicating at the IP address shown by the IP Scanner. This IP address is the one that will always be used by Pi to communicate to the router.
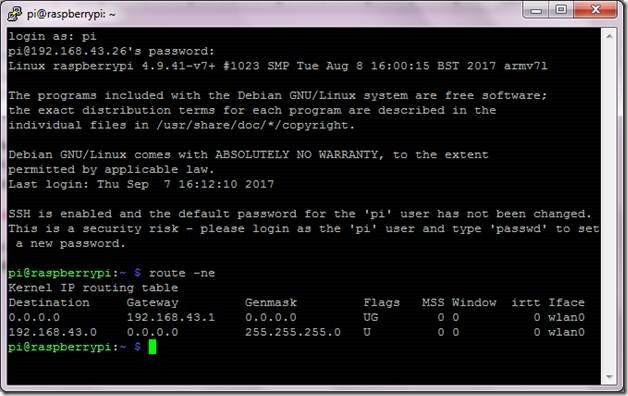
   1: route -ne


clip_image013

Figure 7 Gateway IP address

Once we have noted down the gateway’s IP address, it is time to figure out the name server. This setting is stored in resolv.conf file. Use the following command to pull it up and note down the IP address of the name server.
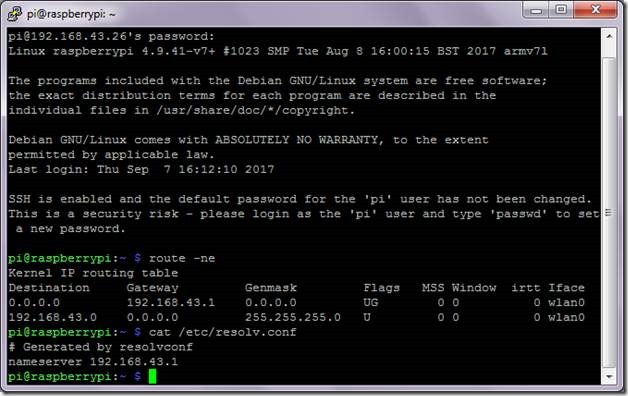
   1: cat /etc/resolv.conf]


clip_image015

Figure 8 Name server IP address

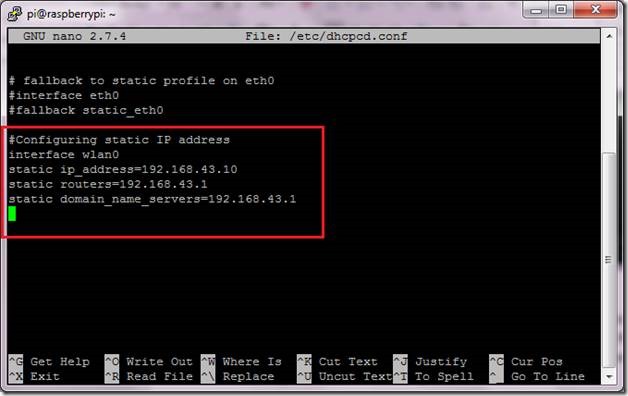
Now we need to modify the file “dhcpcd.conf” file which contains the network settings that go into effect once Pi boots up. Use the following command to pull up the file in editable mode in nano text editor:

   1: sudo nano /etc/dhcpcd.conf]

You should be able to see some pre-existing but, commented out entries showing you the way to configure the settings in this file. We will create a new entry block at the bottom of the file. Use the following entries to configure your Pi to use a static IP address at boot time and communicate to your gateway and use the designated name server:

   1: interface wlan0
   2: static ip_address=”your desired IP address”
   3: static routers=”your router’s IP address” 
   4: static domain_name_servers=”your name server’s IP adderss”
 clip_image017

Figure 9 Configure the entries with the desired IP addresses

Once the aforementioned steps are complete, reboot your Pi for the network settings to take into effect. Use the command to reboot:

   1: sudo reboot –p

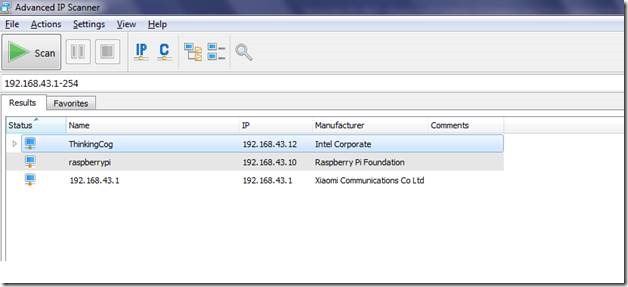
Once your Pi boots up, it will acquire the configured static IP address, and you should be able to login into it, using Putty.
clip_image019

Figure 10 Verification of newly allocated static IP address with the help of IP Scanner
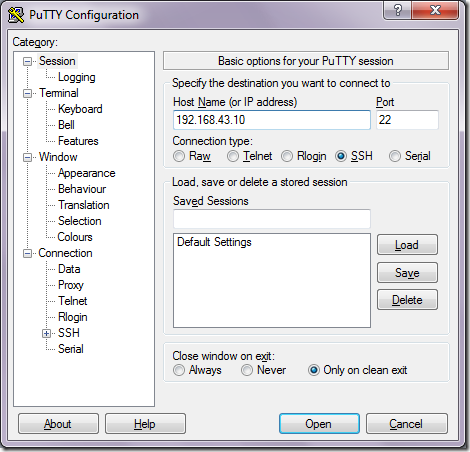
clip_image020


Figure 11 Using the new static IP address to SSH into Pi

Once you have gotten into Pi, pull up the raspberry pi configuration utility to configure the Pi for the following:

1. Change the password from the default “raspberry” to something that only you know. This is an essential security measure.

2. Change the setting in “Advanced Options” to allow the Pi to see and use the entire file space. By default, that is not the case.

3. Change the setting in “Advanced Options” to change the resolution of the screen to what is native to your Windows machine.

4. Enable graphical desktop at boot from “Boot Options”.

5. Enable VNC from the “Interfacing Options” setting so we can use the VNC viewer to login into Pi using the GUI capabilities of Raspbian OS.
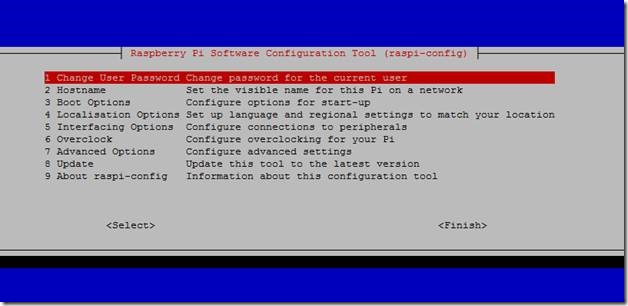
clip_image022

Figure 12 Raspberry configuration utility with all the options available
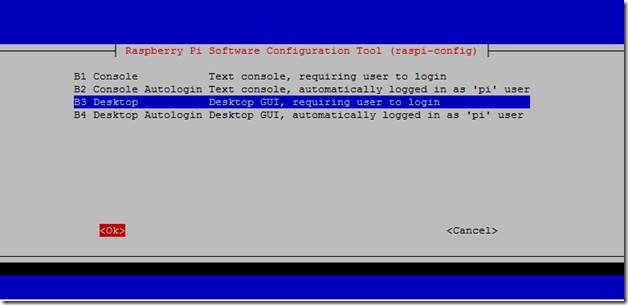
clip_image024

Figure 13 Configuring to boot into desktop mode
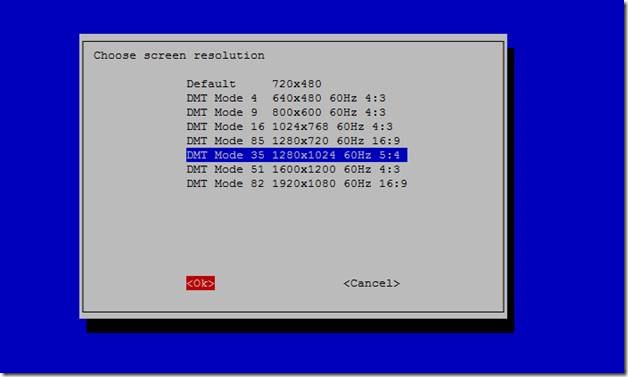
clip_image026

Figure 14 Changing the resolution to that of my Windows machine

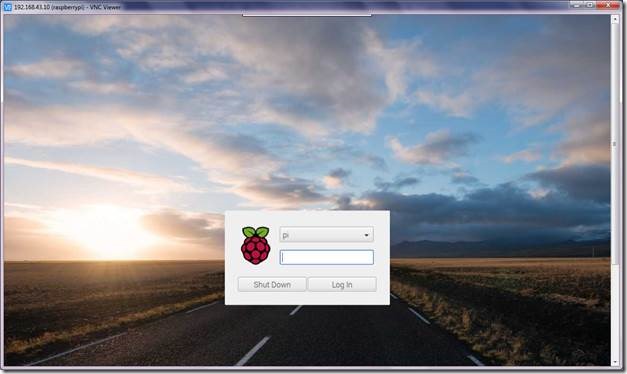
Once all the changes have been done, reboot Pi. Now we will be able to login into Pi using VNC viewer.
clip_image028

Figure 15 First boot into GUI via VNC viewer

We have accomplished all that we had set out to achieve. Now every time you will access Pi, you will be able to access it over a static IP address and login into GUI. From here-on you can go ahead and configure Pi for services that require a static IP address. Depending on your expertise level and requirements, you can completely skip the VNC part and just configure Pi to have a static IP address and operate it over SSH.