ThinkingCog

Articles written by Parakh Singhal

Running Redis in a Master-Slave Replication Setup

Key Takeaway:

Redis has the facility to setup replication with the help of master-slave configurations. A master can have multiple slaves and a slave can further have slaves. In this article we will focus on a simple setup having a single master and two slaves and will discuss a general usage pattern which would allow for a robust setup.

Read on:

Redis allows for configuration in two flavors:

1. With the help of a configuration file,

2. At runtime through commands.

In this article we will setup both the master and slaves with the help of configuration files, as that is something more understandable and how instances are configured in a production environment.

Download the Redis for Windows from MSOpenTech’s GitHub Release page for 64 bit architecture, or if you are having a 32 bit computer, please refer to my previous article on how to compile Redis for a 32 bit Windows environment. Put the folder having all the files needed to run Redis in C drive.

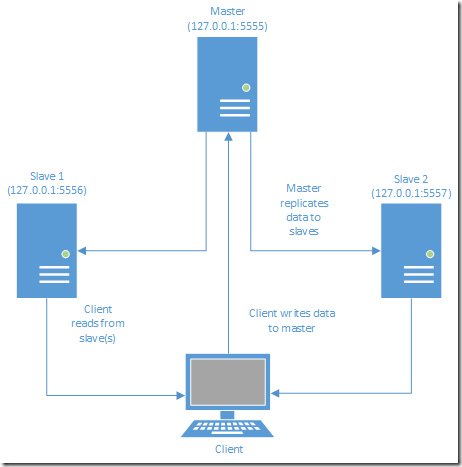
Next we are going to discuss some of the settings required to be implemented in the configuration files, one for each instance of Redis. The general architecture that I am trying to produce here looks something like the following:
Master-Slave-Client Diagram


Figure 1 Redis replication basic architecture

Explanation of the architecture:

In Redis, master instance allows for both reads and writes, and in addition to that allows for disk persistence. Slaves, by default, are read only and allow for disk persistence. Over here, since this is just an introductory article, we are going to learn how to setup the simplest master-slave configuration. A more prudent setup would allow master to engage only with memory writes, and offload disk persistence to one of the slaves, and one or more slaves will dedicatedly handle the read queries. But we will discuss this in some later article.

In order to implement the aforementioned architecture we need to create three configuration files, one for master and one for each of the two slaves.

1. Nomenclature of configuration file:

It is important to name a Redis configuration file in such a way that the purpose and some vital information contained can be gleaned off from the name itself.

We will follow the pattern: redis.hosting environment.type of instance.purpose of instance.port number.conf

So a configuration meant for a master instance would bear the name like redis.windows.master.writes.5555.conf.

2. Creation of configuration files:

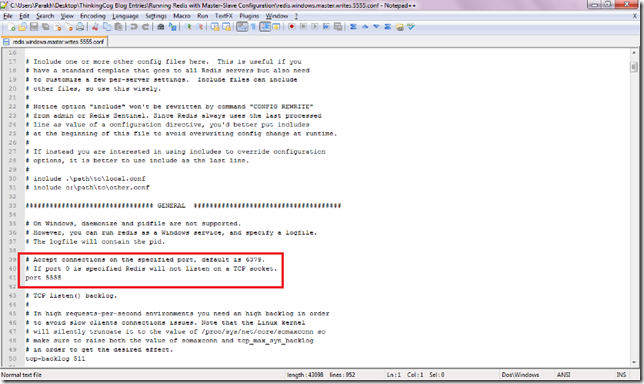
Redis master: Copy the configuration file that comes pre-packaged with Redis and rename it to redis.windows.master.writes.5555.conf, where 5555 is the port that will be dedicated to master instance. You can name it differently according to the port availability on your machine. Open the configuration in a text editor and change the default port from 6379 to the one that is available in your machine.
00 Master Configuration

Figure 2 Configure master instance to run on port 5555

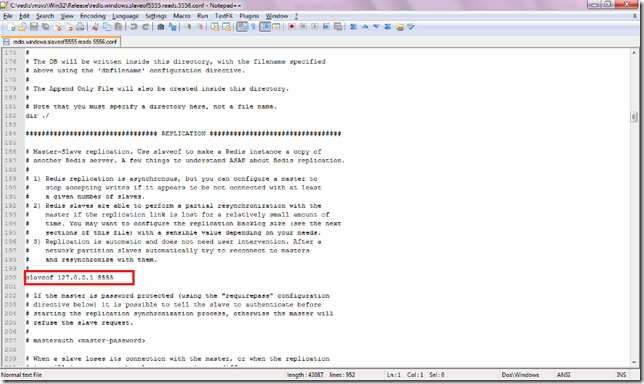
Redis slave 1: Make a copy of the master’s configuration file and name it like redis.windows.slaveof5555.reads.5556.conf. Change the port in the file to 5556 or something that is available on your machine. Now search for the “Replication” section and un-comment the setting of “slaveof” and provide the IP address on which the master instance will be hosted and the port number. Since we will be just running all the three instances locally, the IP address should be 127.0.0.1 and the port number used in the master’s configuration file. The slave instance that we will run will take it’s configuration from this file.
00 Slave Configuration

Figure 3 Configure slave instance to receive synchronization from master

Redis slave 2: Repeat the aforementioned steps, with the exception of changing the port number to 5557 or something that is available on your machine and accordingly use the same port in the name of the file. I have named mine to redis.windows.slaveof5555.reads.5557.conf.

3. Running instances

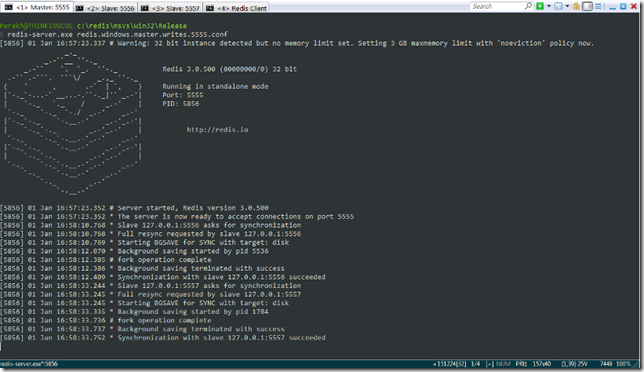
Redis master: Open a command prompt and navigate to the folder where you are having Redis executable files and execute redis-server.exe in conjunction with the name of the configuration where fro it is supposed to pick it’s configuration from.
01 Redis Master

Figure 4 Master instance receives requests for data sync from slaves

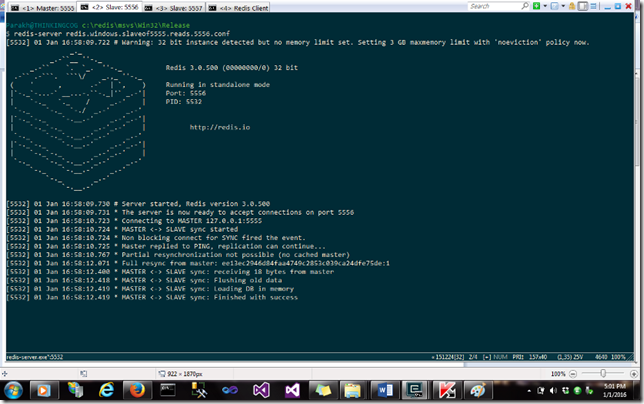
Redis slave 1: Open another command prompt and again run the redis-server.exe file, this time specifying the slave configuration file. This will enable running a slave instance connected to the master. As soon as the slave instance will come up, the master will receive a request from slave for synchronization of data. This is shown in the screenshot.
02 Slave 1

Figure 5 Slave 1 receives and syncs data with master

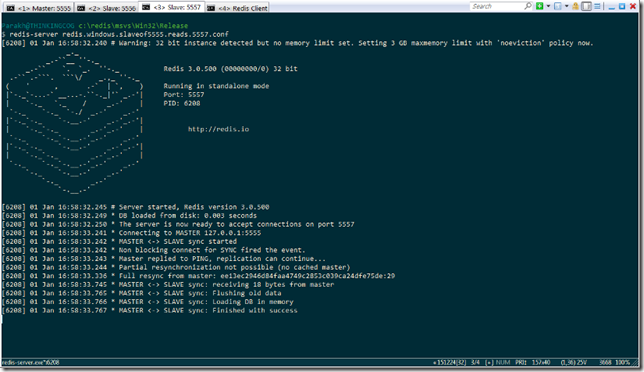
Redis slave 2: Repeat the aforementioned step for slave 1, but with the other configuration file meant for slave 2.
03 Slave 2

Figure 6 Slave 2

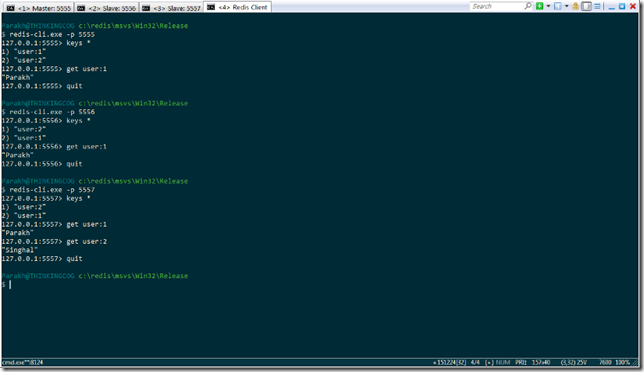
Now run another command prompt and run redis-cli.exe and connect to the master instance. Insert some keys in the master and query them, just to make sure, they have gotten stored. Now disconnect from the master instance and connect to the first slave hosted on port 5556 (or where you hosted it.) and query for the same keys, that you inserted in the master. You will find them. Similarly you will find the same information synchronized in slave 2.
04 Redis Client

Figure 7 Redis client shows that master and slaves are at parity

Conclusion:

Running replication in Redis is very simple and minimal configuration. The pattern shown here, is elementary, just to give an idea about Redis replication. There are more robust architectures that should be used in production settings.

Running Redis as a Service in 32 bit Windows

Key Takeaway:

Learning a lot of NoSQL data-stores is easy in part because all you have to do in order to run the server, is to click on an executable file and it starts listening on a local IP address and port. Redis works the same way. But in order to run Redis in production environment, one cannot rely on a console application listening on a port. After all, there’s always a risk of someone closing the console application and shutting down the entire cache.

To remediate this, we run such products as services. Redis is no exception and in this article we will learn how to run Redis as a Windows service.

Read on:

In my last article I showed how to compile and run Redis in a 32 bit Windows environment. In this article, I am going to use the same build to run it as a Windows service.

NOTE: If you have a 64 bit processor computer, you can directly go to this link and download the binaries, in ready to use condition.

NOTE: It is always preferable to run Redis on non-default port, as that gives us the option of running an ad-hoc instance of Redis server for quick experimentation and learning. In this exercise we are going to run Redis as a service in 32 bit Windows environment and provide the runtime configuration via a configuration file.

1. Navigate to the folder with a sample configuration file. In the source code that folder will be

redis-3.0->msvs->setups->documentation->redis.windows.conf.

2. Locate the line that signifies the port on which the Redis will listen for connections. This is found in “General” category. To search, use the word “port” and change the port number to something that is available on your machine. For this exercise, change it to 6377.

Redis configuration


3. Copy the file in the same folder as redis-server.exe. If you compiled the code that folder will be located at the following location: redis-3.0->msvs->Win32(*mine is 32 bit environment)->Release(* compile configuration). For more information on how compile Redis source code for 32 bit Windows environment, refer to my last post.

4. Open a command prompt and navigate to the location where you are storing the Redis executable named redis-server.exe and execute the following commands:

a. C:/Redis-3.0>Redis-server - -service-install redis.windows.conf  - -service-name “Redis Server”

b. C:/Redis-3.0>net start “Redis Server”

c. C:/Redis-3.0>Redis-cli –h 127.0.0.1 –p 6377

Test Redis installation as a service


5. If the service installation was successful and it started successfully, then you will be able to ping the server and receive a response back.

6. Just in case you decide to uninstall the service, issue the following commands:

a. C:/Redis-3.0\msvs\Win32\Release>net stop “Redis Server”

b. C:/Redis-3.0\msvs\Win32\Release>sc delete “Redis Server”

Stop and uninstall Redis service


Now you can go ahead and practice with Redis command line interface by connecting to this service.

Running Redis in 32 bit Windows

Key Takeaway:

Redis started its life in Linux environment and to this date, it is officially supported only in Linux environment. However, the good folks at Microsoft had started a new division with the sole purpose of porting such useful products to Windows environment and let developers use them with confidence and with the support of Microsoft behind them. Even though that division has now merged back into Microsoft, engineers at Microsoft continue to make contributions to ported projects.

With the 64 bit architecture becoming the de-facto standard in commodity computers, open source contributors and organizations around the world have started to focus on releasing binaries for 64 bit architectures. That leaves people like me who are living perfectly fine life with their old trusty computers having 32 bit processors powering them. The silver lining in this scenario, is that if you have access to the source code of a product, then you can compile it for 32 bit architecture and then use it.

This article shows how to download Redis source code, compile it using Visual Studio for a 32 bit architecture and then run it in a Windows environment.

Read on:

If you are a .Net developer, chances are that you have for majority of your professional life, written code on Windows platform, for Windows platform. On top of that if you have an old computer powered by a 32 bit processor, then you are striving to find ways to learn the new and up-coming technologies, such as NoSQL databases – MongoDB, Redis etc. which primarily have been released for 64 bit architectures.

I have been working with Redis since the past couple of months now and started learning Redis on my personal laptop which at the time of writing this article is 8 years young. This sometimes leaves me in a bit of a lurch as the newer projects and products are mainly focusing on releasing for 64 bit architectures. Well, all is not lost if you are willing to put up a little fight and compile the source code yourself, if it is available.

Thankfully Microsoft recognized that .Net developers should not get left behind when it comes to awesome products like Redis, just because they are not available to be run in the Windows environment, and hence they created a dedicated entity, Microsoft Open Tech Group devoted to porting these technologies in the Windows environment, and further the collaboration with the open source community. Redis is one of the projects that the group is handling at the moment.

Alright, so let’s run Redis on Windows in 32 bit architecture. Pre-requisite for accomplishing this is the newest version of Visual Studio 2013 with update 5, as without update 5, the process might not work successfully. If you do not have a paid version of Visual Studio, Community Version which is available for free here will also work.

1. Head over to Microsoft Open Tech Group’s Redis GitHub page for version 3.0 and download the source code available as a zip file.

2. Unzip the code in a folder in C drive. Make sure that the folder name in which the source code is housed bears a name with no space or special character.

3. Open the solution located in the msvs folder in Visual Studio.

4. Open the solution’s properties and go to the configuration manager and change the “Active solution configuration” to Release and “Active solution platform” to x86.

clip_image002


5. Now build the solution. Note there will be a few warnings that’ll come up, but ignore them.

6. Once the build completes, you will notice that there will be a new folder named “Win32” that would have gotten created. Inside this folder will be another folder “Release”. Release folder contains the final build and the executable files that we can use to run and learn Redis.

7. Locate the file “redis-server.exe” and execute it. It should come up looking something like shown here. This is the Redis server which by default listens on IP address 127.0.0.1 and port 6379.

clip_image004


8. Locate the file “redis-cli” and execute it. It should come up looking something like shown here. This is Redis command line interface and by default it sends commands on the address and port of 127.0.0.1 and 6379 respectively.

clip_image006


Lo and behold, we have Redis running in 32 bit Windows environment. Thanks to the brilliant folks at Microsoft for porting this valuable piece of technology to Windows environment.

Hello Redis

2015 is coming to an end, and I have not written as much as I should have. It has been a busy year for me on the learning end and I am glad about it. Slowly, but surely, I am moving my career in the direction that I always wanted it to go. This year has been the year of NoSQL databases for me.

There’s a storm going on in the NoSQL database world, each one vying to grab mindshare and occupy a place in your development stack. Now that developers have started to understand the segment better than before, these data-stores can be safely classified into broad categories per their use case fit, such as:

1. Want to write everything to file in a schema-less environment – go for document oriented databases like MongoDB, RavenDB etc.

2. Want to deal with deep hierarchical data and process it real fast – go for graph databases such as Neo4J, OrientDB etc.

3. Want to store everything in-memory for fast retrieval – go for in-memory data-stores like Memcached, Redis, Hazelcast etc.

and so on.

It is the first and the third categories in the aforementioned list, that can be leveraged in general purpose applications and either are already in enterprise-ready state or will be in a release or two.

I recently started learning about distributed caching solutions for one of my open source projects and thus began my journey to learn one.

A distributed cache is built upon the fundamental idea of separating out the caching component from the ones provided by programming frameworks like .Net and be hosted independently. When this idea spans several servers, it becomes distributed in nature, hence the name distributed cache.

Some of the major distributed cache products available can be found over at Wikipedia. Of particular interest are Memcached, Riak, Redis and Hazelcast, as they are free for any use and have got a wide community support. At the core of all products is the central idea of storing data in RAM as a key-value pair. Of course, different products differentiate from one another on the basis of features.

It has been a short while since I have been working with Redis, and I have decided to include it in all my web projects, if I have my way.

While this article is not having anything usable technical stuff or practical utility for that matter, I just wanted to write something, and at this time, Redis is all I have in my mind. I hope the departing year was a fruitful one for you, and I wish my best for the upcoming year.