Key Takeaway:
Installation of the Raspbian operating system on a Raspberry Pi requires an external keyboard and mouse for providing input and an external HDMI monitor to see what’s happening. In this post, we will learn how to configure the boot media, so that we are able to leverage our existing Windows hardware for the installation and subsequent operations without requiring an external keyboard, mouse and a monitor, also known as the “headless mode”. We will also be connecting our Pi to our Wi-Fi network without the any intermediate use of an Ethernet cable and will allocate it a static IP address.
Read On:
Raspberry Pi is a single board computer that offers a fun way to learn about Linux and is capable of handling various projects that require light to medium computing power. It is one of the most favored platforms for prototyping an IoT project.
Installation of most of the Raspberry Pi compatible operating systems at the time of writing this post requires the presence of an external USB keyboard and mouse to provide input and an HDMI capable monitor to receive video feed of what’s happening. These requirements prove to be a bit of a hurdle in getting Raspberry Pi up and running. Fortunately, things are improving and creators of Linux distros are making sure that there are ways to configure Raspberry Pi to facilitate a headless install, configuration and subsequent operation with the use of existing integrated hardware like a pc or a laptop.
In this post I will demonstrate how to install and operate Raspbian operating system in a truly headless fashion using your existing Windows PC hardware. We will accomplish the following:
1. Enable SSH for logging into Pi after the first boot.
2. Connect to existing Wi-Fi with the help of supplied credentials.
3. Have a static IP address, so in future we will have the ability to reliably connect to Pi at a known address and enable us to operate services like a NAS or a media server.
4. Enable VNC server on Pi so we can remotely login into Pi and use the convenience of GUI to get things done.
To accomplish all that we need the following hardware and software:
1. Raspberry Pi 3 Model B.
2. A Windows or Linux enabled laptop or a desktop computer to download the Raspbian image to.
3. A micro-SD card to install Raspbian image onto.
4. A micro SD card reader-writer.
5. Image of the latest version of Raspbian operating system (with desktop).
6. Etcher to transfer the Raspbian operating system onto the micro-SD card.
7. Notepad++ to create configuration files. Please note that Windows Notepad won’t cut it.
8. Advanced IP Scanner to scan the network to note the subnet and ip addresses of various devices.
9. Putty to SSH into Pi after the installation of the operating system.
10. VNC viewer to remotely login into Raspbian operating system.
I am writing this post assuming that you are working with a Windows enabled computer.
Head over to RaspberryPi.org and download the latest version of Raspbian operating system with desktop. Now we need to transfer this operating system to the micro-SD card.
To transfer the operating system onto the micro-SD card we will be using Etcher from resin.io. Brilliantly simple to use and just works with a wide variety of image formats. Etcher can directly work with zipped images, eliminating the need to unzip the downloaded images. You can also download the portable version and use it without installing it.
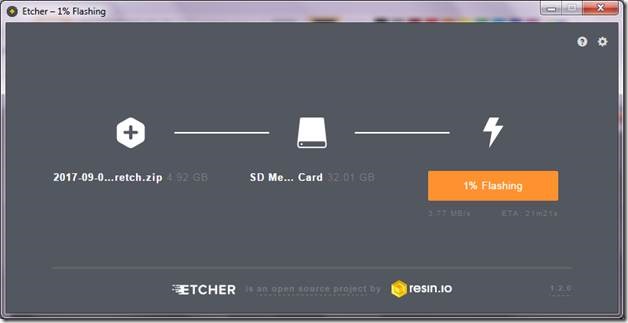
Figure 1 Etcher in action
Once you have flashed and validated the micro-SD card with the operating system, prepare to perform some steps that are going to make the entire installation and subsequent operation a headless one. If you open the card in Windows Explorer, then you will be able to access the boot folder containing a few files. Since Windows does not recognize EXT4 file system, you will not be able to see or access any other of the partition on the card or any folder or file contained therein.
Enabling SSH
To enable headless configuration and operation of Raspberry Pi, it is essential that we have some mechanism to login into our Pi. SSH enables that. By default, SSH now comes disabled in Raspbian Stretch operating system. But it can be easily enabled by introducing a file named “ssh” with no extension. You do not have to bother putting anything in the file as just the presence of the file will indicate your intention to enable SSH in Raspbian at the first and subsequent boots.

Figure 2 Insert a blank text file SSH excluding any extension
Configuring Wi-Fi
One of the changes introduced in Raspbian Stretch was the ability to put “wpa_supplicant.conf” file into the boot folder which at first boot could be used to configure network settings. So open up your Notepad++ and open a new text file. Make sure to change the “End of Line” setting set to “UNIX” (Edit->EOL Conversion). If you do not change this setting, Notepad++ will use Windows end of line settings and network settings will not take effect.

Figure 3 Change the EOL setting in Notepad++ to UNIX when handling any file for Raspbian
Insert the following settings into the file:
1: country=in
2: update_config=1
3: ctrl_interface=/var/run/wpa_supplicant
4:
5: network={
6: scan_ssid=1
7: ssid="MyNetworkSSID"
8: psk="MyNetworkPassword"
9: }
Change the country entry to the applicable one. Similarly use the SSID of your Wi-Fi network and corresponding password.
Save the text file in the boot folder and name it “wpa_supplicant.conf”. The significance this file is that it serves the configuration to the supplicant (basically hardware or software that connects to a network. More info is available here), and after the first boot gets copied into the “/etc/wpa_supplicant” directory for operational purposes. You can read more about this here (in context with Raspbian Stretch).
Now that we have taken care of SSH and Wi-Fi settings, let’s get ourselves a static IP address where we can SSH to. Boot up your Pi.
Configuring for a static IP address
Now to assign a static IP address to our Pi, we need to login into Pi at the IP address that gets allocated to our Pi at its first boot. We will use that IP address in Putty and start our SSH session and carry out further configuration to work with a static address.
We can find the IP addresses allocated to various devices with the help of the Advanced IP Scanner tool available from Famatech. The best thing about this tool is that you can run this tool without installing it, in portable mode. Boot up your Pi and then run this tool to see the IP address allocated to the device.
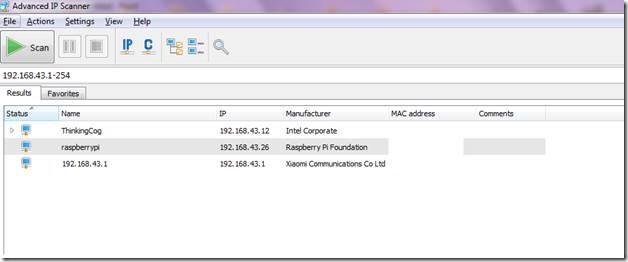
Figure 4 Raspberry Pi connected to Wi-Fi with a random IP address allocated
Once you have noted down the IP address allocated to Pi, use Putty or your favorite SSH tool to login into Pi.
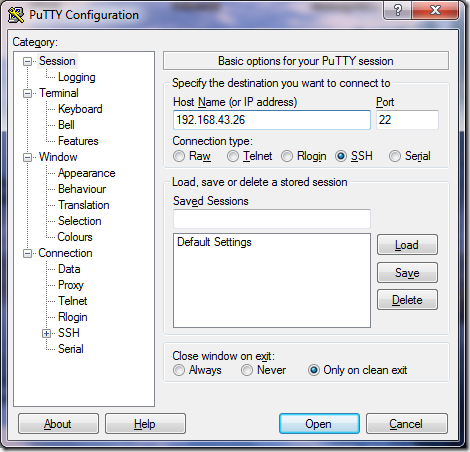
Figure 5 SSH into Pi using the allocated IP address
The default username and password to be used for logging into Pi are “pi” and “raspberry” respectively. After logging into Pi via SSH, use the following steps to configure Pi to have a static address.
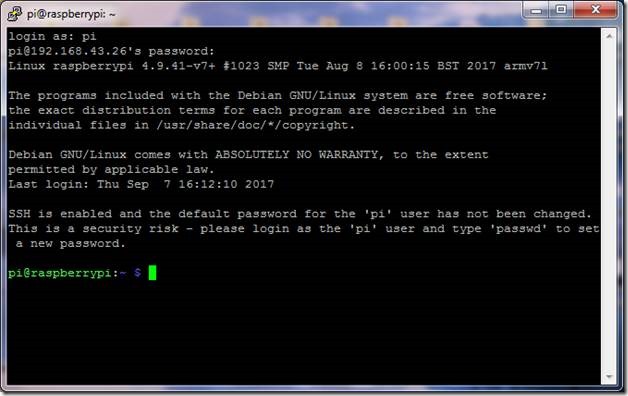
Figure 6 Successful SSH login
Now give the following command to know about the gateway (your router in this case), just to be sure that your Pi is communicating at the IP address shown by the IP Scanner. This IP address is the one that will always be used by Pi to communicate to the router.
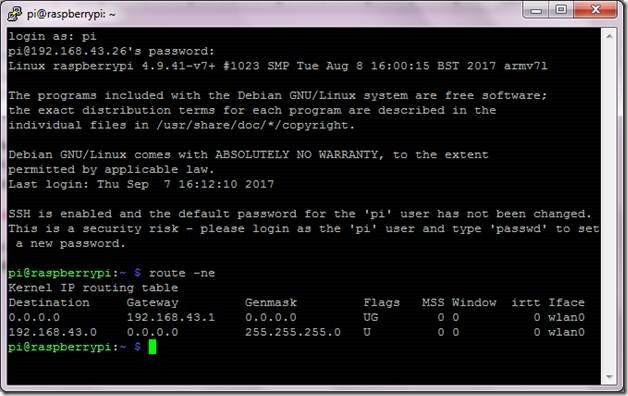
Figure 7 Gateway IP address
Once we have noted down the gateway’s IP address, it is time to figure out the name server. This setting is stored in resolv.conf file. Use the following command to pull it up and note down the IP address of the name server.
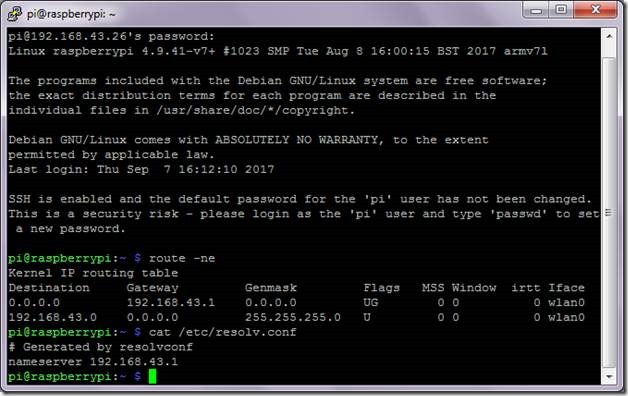
Figure 8 Name server IP address
Now we need to modify the file “dhcpcd.conf” file which contains the network settings that go into effect once Pi boots up. Use the following command to pull up the file in editable mode in nano text editor:
1: sudo nano /etc/dhcpcd.conf]
You should be able to see some pre-existing but, commented out entries showing you the way to configure the settings in this file. We will create a new entry block at the bottom of the file. Use the following entries to configure your Pi to use a static IP address at boot time and communicate to your gateway and use the designated name server:
1: interface wlan0
2: static ip_address=”your desired IP address”
3: static routers=”your router’s IP address”
4: static domain_name_servers=”your name server’s IP adderss”
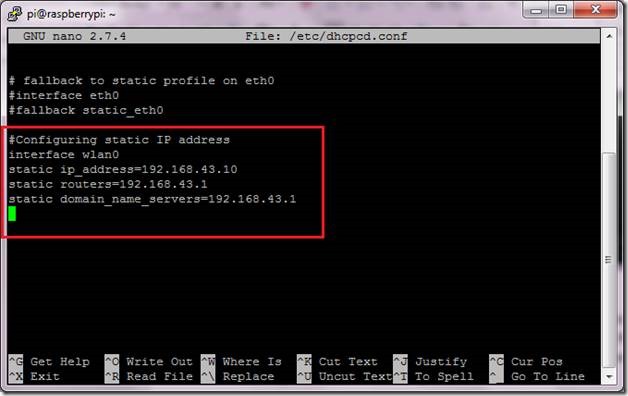
Figure 9 Configure the entries with the desired IP addresses
Once the aforementioned steps are complete, reboot your Pi for the network settings to take into effect. Use the command to reboot:
Once your Pi boots up, it will acquire the configured static IP address, and you should be able to login into it, using Putty.
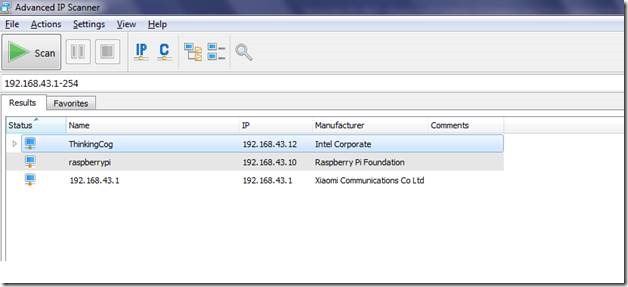
Figure 10 Verification of newly allocated static IP address with the help of IP Scanner
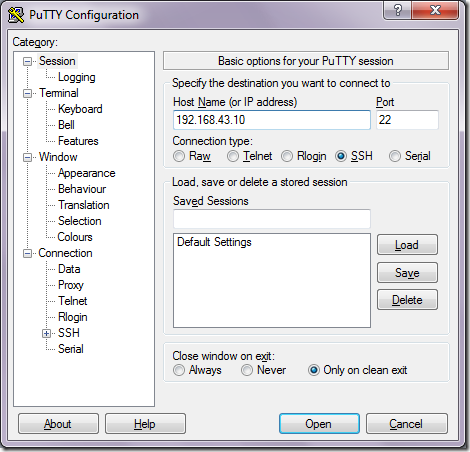
Figure 11 Using the new static IP address to SSH into Pi
Once you have gotten into Pi, pull up the raspberry pi configuration utility to configure the Pi for the following:
1. Change the password from the default “raspberry” to something that only you know. This is an essential security measure.
2. Change the setting in “Advanced Options” to allow the Pi to see and use the entire file space. By default, that is not the case.
3. Change the setting in “Advanced Options” to change the resolution of the screen to what is native to your Windows machine.
4. Enable graphical desktop at boot from “Boot Options”.
5. Enable VNC from the “Interfacing Options” setting so we can use the VNC viewer to login into Pi using the GUI capabilities of Raspbian OS.
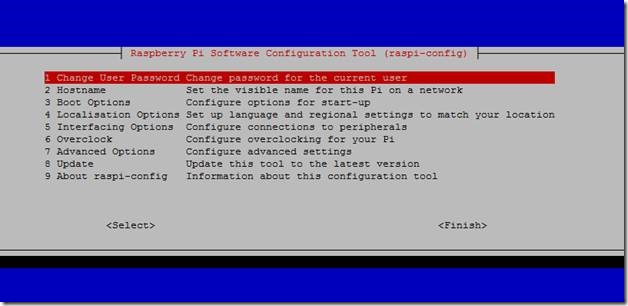
Figure 12 Raspberry configuration utility with all the options available
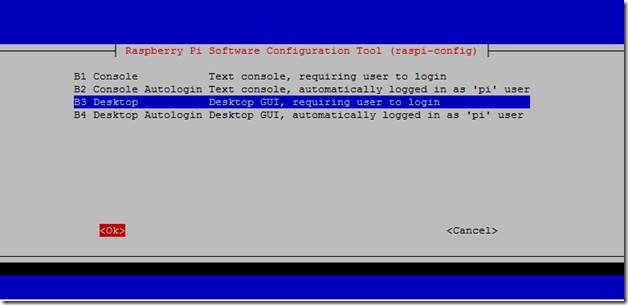
Figure 13 Configuring to boot into desktop mode
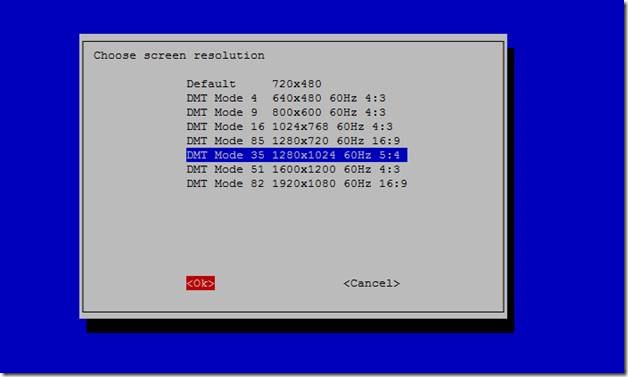
Figure 14 Changing the resolution to that of my Windows machine
Once all the changes have been done, reboot Pi. Now we will be able to login into Pi using VNC viewer.
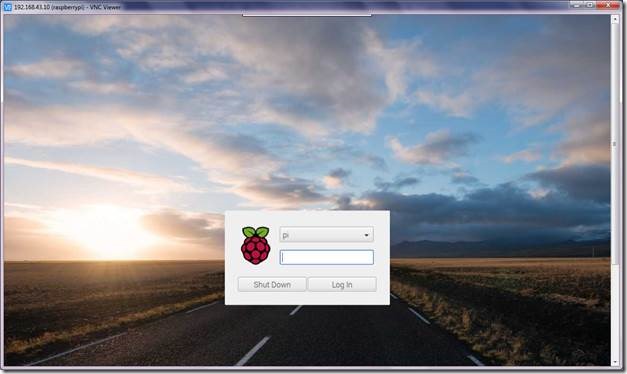
Figure 15 First boot into GUI via VNC viewer
We have accomplished all that we had set out to achieve. Now every time you will access Pi, you will be able to access it over a static IP address and login into GUI. From here-on you can go ahead and configure Pi for services that require a static IP address. Depending on your expertise level and requirements, you can completely skip the VNC part and just configure Pi to have a static IP address and operate it over SSH.