Git is a super flexible version control system and offers capabilities that you may have felt the need for when working with other version control systems, but were not available. One such capability that is available is the ability to assign parts of a file in a commit, thereby, creating a logical sequence to the work done in a file over time.
Let’s understand the patch operation in Git via a simple example.
Consider a text file that you have created over time and you want the work to go in two separate commits representing a logical sequence to work:
$ mkdir PatchDemo
$ cd PatchDemo
$ git init
$ touch file.txt
$ notepad file.txt
Key in the following lines inside the file as shown in the image below:
Line 1 - Work done in first commit
Line 3 - Work done in first commit
Line 5 - Work done in first commit
Line 7 - Work done in first commit
Line 9 - Work done in first commit
Line 11 - Work done in first commit
Line 13 - Work done in first commit
Line 15 - Work done in first commit
Line 17 - Work done in first commit
Line 19 - Work done in first commit
Line 21 - Work done in first commit
Line 23 - Work done in first commit
Line 25 - Work done in first commit
The reason why we are introducing text in this fashion is to allow sufficient room for Git to differentiate between the work done in different logical sequences. In Git terminology, the work that needs to go in a certain patch is called a hunk. A patch can contain several hunks.
For text to be considered in different hunks, there needs to be a large enough difference between pre-existing work and new work meant to go in a hunk. Hence alternate lines in the original file would constitute a somewhat large enough body of pre-existing work.
Now let’s commit the work done:
$ git add file.txt
$ git commit -m “First commit consisting of work done in file.txt”
Now let’s modify the file:
Line 1 - Work done in first commit
Line 2 – Work done in second commit
Line 3 - Work done in first commit
Line 5 - Work done in first commit
Line 7 - Work done in first commit
Line 9 - Work done in first commit
Line 11 - Work done in first commit
Line 12 – Work done in third commit
Line 13 - Work done in first commit
Line 15 - Work done in first commit
Line 17 - Work done in first commit
Line 19 - Work done in first commit
Line 21 - Work done in first commit
Line 23 - Work done in first commit
Line 24 – Work done in second commit
Line 25 - Work done in first commit
Now let’s do the interactive staging of the file.txt and use the patch functionality to stage file.txt for two separate commits:
This will start the interactive staging and it will look somewhat like in the following figure:

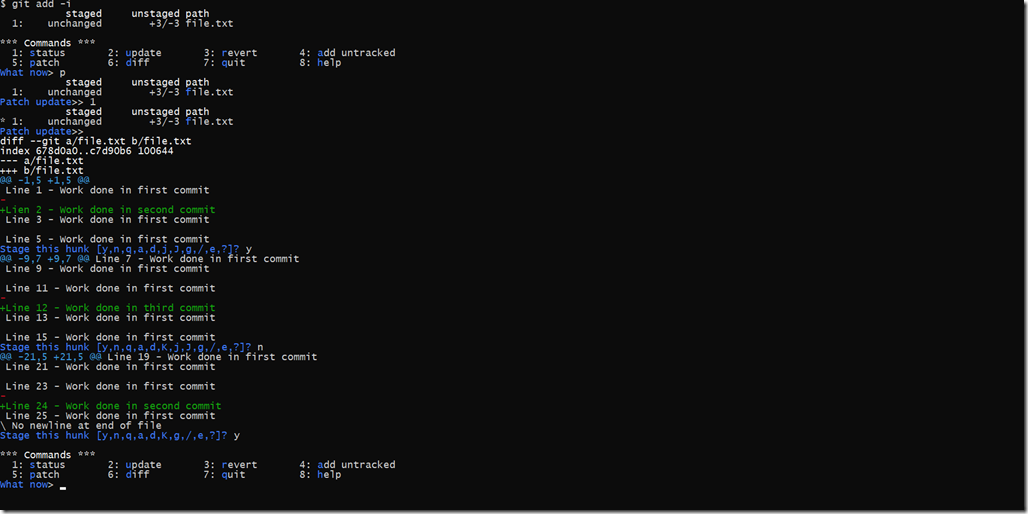
Once you enter interactive staging, you will be asked to choose from several options viz. status, update, revert, add untracked, patch, diff, quit and help. You need to choose “p” or number 5 to perform a patch.
Once that is selected, git presents you with a list of files that are available in the repository. Note, that in this case we only have one file and it shows the status of the file as consisting of 3 unstaged changes. You need to enter the serial number of the file you want to patch, thus, in this case, that would be 1.
Git will show an asterisk next to the selected file and will ask for permission to move further. You need to hit enter once to permit Git to move ahead.
Once we permit to parse the file, Git will present you hunks i.e. changes that the file contains that are not available in its last committed version. The lines in green show the changes, while the ones in white show the pre-existing work. Just below the hunk is the query posted by Git, and presented with one letter acceptable answers. If you want to know more about the meaning of those letters, press “?”. It will present you with the meaning of all those options like in the following figure:

In our case, we want to stage the first and the third hunks. Git then moves forward and presents you the next hunk. In the second hunk, we have the line added “Line 12 – Work done in the third commit”, and accordingly we would preserve it for the third commit. So you need to press “y” for the first and third hunks and n for the second hunk.
Once you are done marking the hunks that need to go into a commit, you will be re-directed to the initial menu. This time, press “s” for getting the status and you would be presented something like shown in the following figure:

We can see in the image that now we have staged two changes and one remains unstaged. The staged changes are the two hunks that we staged in our previous steps of selecting hunks, while the one unstaged change is the hunk that we did not selected to go into our patch.
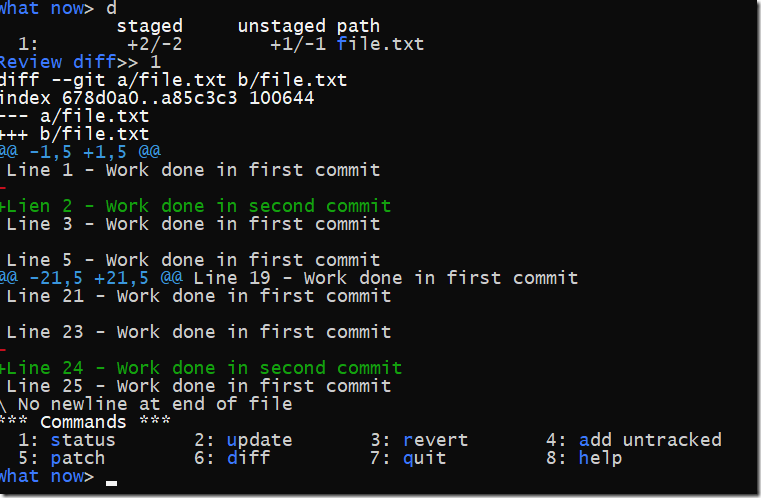
If you run a diff, then you will be able to see the changes that will go into the next commit, appearing in green and the existing work appearing in white, as shown below:

Now let’s quit this interactive staging utility and run git status. This would give us something like shown in the following figure:

The reason Git is showing the same file in the staged and unstaged form is, because we have staged only part of the file in the form of the selected two hunks.
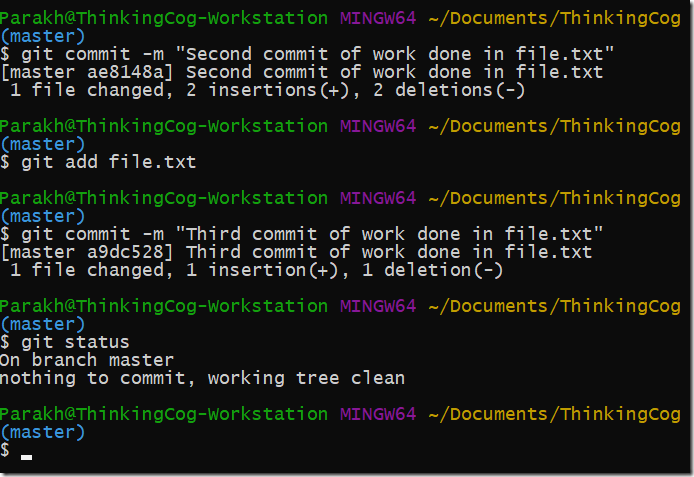
Now we can go about our business as usual, and make two commits – The first commit consisting the two selected hunks and the second commit having the rest of the changes, as shown in the figure below:

As you can see the first commit carried two changes and the second commit carried a single change. Once we are done with the two commits, there were no changes to be committed any further.