ThinkingCog

Articles written by Parakh Singhal

Delegates And Events – Part 2 of 3

In my last post, I explained the concept of events, delegates, and event handlers at a high level. In this post, let’s take a look at delegates. Why delegates and not events, because among them, they are the tricky ones and can be understood in relative isolation.

Delegates form the glue connecting the events and event handlers and are instrumental in conveying to all the subscribed event handlers about the firing of an event. What I will try to show in this post are the following:
1. High-level conceptual coverage of delegates,
2. Technical overview of delegates,
3. How a delegate can execute a connected method, aka an event handler

High-Level Overview:

Consider the following scenario where you have a pipeline going out from a pumping station and connected to that pipeline are houses and industries. Houses will use the supplied water for cleaning, cooking, etc. while the industries will use the same water for chemical and other manufacturing purposes. Water Pumping station supplying water to homes and industries


The pumping station here is synonymous with an event firing when an action of interest takes place. The water is the information conveyed by the event, and the houses and industries are the event handlers which process the supplied water, aka the information in the desired form. Delegates form the plumbing connecting the events and event handlers.

Before we move any further, we must understand what is a callback mechanism.

Callback Mechanism

Essentially, a callback mechanism that lets us chain pieces of code together in such a way that the first piece calls the second. The call can be made in two ways:

1) Synchronous callbacks, in which the first code (calling code) waits for the second code (called code) to finish the work and deliver the result, and, only after that resumes execution.
E.g. You can have a windows form application which has a button which upon clicking starts execution of a long running process. While the process is running the windows form will remain unresponsive.

2) Asynchronous callbacks, where the first code calls the second code but does not wait for it to finish the work. The work by the second piece of code is carried out on a different thread.

Callback mechanism is known by different names in different programming languages. In C, it is known as function pointers, and in C# it is called “delegates”.

In C#, delegates form the plumbing that allows one code to call another code synchronously or asynchronously. Adding to that is the fact that they are type-safe, i.e. you can only call methods that comply with the delegate’s signature and return type. In this post we will focus only on the synchronous calling via delegates

Use cases for delegates

Delegates can be used in two scenarios:

1. To broadcast changes in an object’s state
2. To broadcast fulfillment of a condition

Delegates behind the scenes are a special type of class, which means that we need to create an object of delegate type to use it for callback purposes.

Let’s dive into practical examples that show the use cases in action.

Broadcast changes in an object’s state


Consider human beings and their sensitiveness to ambient temperature. We can create a class “Human” and broadcast the response of its object to different temperatures.

public class Human
    {
        // Basic properties
        public int Id { get; set; }
        public string Name { get; set; }
        public float MinTemp { get; set; }
        public float MaxTemp { get; set; }
 
        //Delegate declaration
        public delegate void TemperatureSensationHandler(string message);
 
        // Member variable of the declared delegate
        public TemperatureSensationHandler temperatureSensationMembers;
 
        public Human()
        {
        }
 
        // User defined constructor
        public Human(int id, string name, float minTemp, float maxTemp)
        {
            Id = id;
            Name = name;
            minTemp = MinTemp;
            maxTemp = MaxTemp;
        }
 
        public void TemperatureSensation(float temperature)
        {
            if (temperatureSensationMembers!= null)
            {
                if (temperature > MaxTemp)
                {
                    temperatureSensationMembers("I am feeling hot");
                }
                else if (temperature < MinTemp)
                {
                    temperatureSensationMembers("I am feeling cold");
                }
                else
                {
                    temperatureSensationMembers("I am feeling normal");
                }
            }         
        }
    }


In the code above, we have a class "Human" with four properties, of which two are of importance - MinTemp and MaxTemp. The method TemperatureSensation accepts a float type parameter and depending upon where the value stands in the spectrum between MinTemp and MaxTemp, broadcasts an appropriate message. In the following code, we create an object of the Human class and test the functionality of delegate declared in the Human class.

class Program
    {
        static void Main(string[] args)
        {
            Human human = new Human() 
{ Id = 1, Name = "Parakh", MinTemp = 25.5f, MaxTemp = 45.0f };
 
            human.temperatureSensationMembers += OnTemperatureSensationEvent;
            human.TemperatureSensation(100);
            human.TemperatureSensation(30);
            human.TemperatureSensation(10);
            Console.ReadLine();
        }
 
        public static void OnTemperatureSensationEvent(string message)
        {
            Console.WriteLine(message);
        }
    }


In the code above we created an object of the Human class and instantiated it with some data. Then, we enrolled in the delegate object a method that matched the delegate’s signature and return type. Then we invoked the TemperatureSensation method on the human object which then broadcasted the messages to the delegate’s subscribed members.

The above code when executed yields the following outputBoradcast changes in an object's state

Now there’s one flaw in the code above. Delegate class at the .Net framework level overrides the “+” and “-“ operators, allowing the subscription and unsubscription of complying methods. It means that having direct access to the delegate object is sensitive and a developer should not be able to empty a delegate object’s invocation list by using the “-“ operator repeatedly.

We thus encapsulate the subscription and unsubscription of the methods to the delegate object via methods.

public class Human
    {
        // Basic properties
        public int Id { get; set; }
        public string Name { get; set; }
        public float MinTemp { get; set; }
        public float MaxTemp { get; set; }
 
        //Delegate declaration
        public delegate void TemperatureSensationHandler(string message);
 
        // Member variable of the declared delegate
        private TemperatureSensationHandler temperatureSensationMembers;
 
        //Registration and un-registration methods
        public void RegisterTempSensationHandlerMethods(TemperatureSensationHandler methodToRegister)
        {
            temperatureSensationMembers += methodToRegister;
        }
 
        public void UnRegisterTempSensationMethods(TemperatureSensationHandler methodToUnregister)
        {
            if (temperatureSensationMembers != null)
            {
                temperatureSensationMembers -= methodToUnregister;
            }
        }
 
        public Human()
        {
 
        }
 
        // User defined constructor
        public Human(int id, string name, float minTemp, float maxTemp)
        {
            Id = id;
            Name = name;
            minTemp = MinTemp;
            maxTemp = MaxTemp;
        }
 
        public void TemperatureSensation(float temperature)
        {
            if (temperatureSensationMembers!= null)
            {
                if (temperature > MaxTemp)
                {
                    temperatureSensationMembers("I am feeling hot");
                }
                else if (temperature < MinTemp)
                {
                    temperatureSensationMembers("I am feeling cold");
                }
                else
                {
                    temperatureSensationMembers("I am feeling normal");
                }
            }         
        }
    }

With the modified code, we now can register and un-register the methods without exposing the delegate object to a developer.

The code above yields the same output.

Boradcast changes in an object's state

Broadcast of fulfilment of a condition


Some conditions warrant broadcast of information when they materialize. Examples would include intimation upon sending or receiving a message, dispatch, and delivery of a physical item in case of e-commerce applications, etc.

Here we will take an example of checking out a book from a library.

We have four classes - Book, Member, Author, and Library. The idea in this example is to broadcast a message upon execution of certain activities like searching for a book, searching for member records, and successful or unsuccessful checking out of a book.

public class Author
   {
        public int AuthorId { get; set; }
        public string FirstName { get; set; }
        public string LastName { get; set; }
    }
 
public class Book
    {
        public int BookId { get; set; }
        public string ISBN { get; set; }
        public string Title { get; set; }
        public Author Author { get; set; }
        public int PageCount { get; set; }
        public bool IsCheckedOut { get; set; }
    }
 
public class Member
    {
        public int MemberId { get; set; }
        public string FirstName { get; set; }
        public string LastName { get; set; }
        public int NumberOfBooksCheckedOut { get; set; }
        public List<Book> BooksCheckedOut { get; set; }
    }
 
    public class Library
    {
        public int LibraryId { get; set; }
        public List<Book> Books { get; set; }
        public List<Member> Members { get; set; }
        public Library()
        {
            LibraryId = 1;
            Books = new List<Book>()
                        {
                            new Book()
                            {
                                BookId = 1, 
                                Title = "Alice in Wonderland", 
                                IsCheckedOut = false, 
                                PageCount = 200,
                                Author = new Author() 
                                { 
                                    AuthorId = 1, 
                                    FirstName = "Lewis", 
                                    LastName = "Carroll"
                                }
                            },
                            new Book()
                            { 
                                BookId = 2, 
                                Title = "Bad Blood", 
                                IsCheckedOut = false, 
                                PageCount = 350,
                                Author = new Author()
                                { 
                                    AuthorId = 2, 
                                    FirstName = "John", 
                                    LastName = "Carreyrou"
                                }
                            },
                            new Book()
                            { 
                                BookId =  3, 
                                Title = "The Dream Machine", 
                                IsCheckedOut = false, 
                                PageCount = 250,
                                Author = new Author()
                                { 
                                    AuthorId = 3, 
                                    FirstName="Mitchell", 
                                    LastName = "Waldrop"
                                }
                            },
                            new Book()
                            { 
                                BookId = 4, 
                                Title = "The Structure of Scientific Revolution", 
                                IsCheckedOut = false,
                                PageCount = 500, 
                                Author = new Author()
                                { 
                                    AuthorId = 4, 
                                    FirstName = "Thomas", 
                                    LastName=  "Kuhn"
                                }
                            },
                            new Book()
                            { 
                                BookId =5,
                                Title = "Sapiens: A Brief History of Humankind", 
                                IsCheckedOut = false,
                                PageCount = 450, 
                                Author =new Author() 
                                { 
                                    AuthorId = 5, 
                                    FirstName = "Yuval", 
                                    LastName = "Hariri"
                                }
                            }
                        };
            Members = new List<Member>()
                        {
                            new Member()
                            { 
                                MemberId = 1, 
                                FirstName = "Parakh", 
                                LastName = "Singhal", 
                                NumberOfBooksCheckedOut = 0
                            },
                            new Member()
                            { 
                                MemberId = 2, 
                                FirstName = "Prateek", 
                                LastName = "Mathur", 
                                NumberOfBooksCheckedOut = 0
                            },
                            new Member()
                            { 
                                MemberId =3, 
                                FirstName = "Sumant", 
                                LastName = "Sharma", 
                                NumberOfBooksCheckedOut = 0
                            }
                        };
 
        }
 
        //Delegate which can accept methods having a string parameter
        public delegate void CheckoutHandler(string message);
 
        private CheckoutHandler checkOutHandlerMembers;
 
        public void RegisterCheckOutHandlerMembers(CheckoutHandler methodToRegister)
        {
            checkOutHandlerMembers += methodToRegister;
        }
 
        public void UnRegisterCheckOutHandlerMembers(CheckoutHandler methodToUnregister)
        {
            if (checkOutHandlerMembers != null)
            {
                checkOutHandlerMembers -= methodToUnregister;
            }
        }
 
        public void CheckOutBook(int MemberId, int bookId)
        {
            //The operation of search will be printed out by the program only 
            //if there are members to the delegate type
            if (checkOutHandlerMembers != null)
            {
                checkOutHandlerMembers("Searching for book and Member records");
            }
 
            Book bookToBeCheckedOut = Books.Find(book => book.BookId == bookId);
            Member MemberCheckingOut = Members.Find(Member => Member.MemberId == MemberId);
 
            //The operation of success in finding the book and Member will
            //only be printed if there are members to the delegate type
            if (bookToBeCheckedOut != null &&
                MemberCheckingOut != null && 
                checkOutHandlerMembers != null)
            {
                checkOutHandlerMembers("Book and Member records found.");
            }
 
            if (bookToBeCheckedOut.IsCheckedOut == false)
            {

//The final result, whether the book can be checked

//out needs to be printed whether

                //there are any members to the delegate type. 
                //That's why if-else statement with duplicate
                //console writes
                if (checkOutHandlerMembers != null)
                {
                    checkOutHandlerMembers("Congratulations, the book is available");
                }
                else
                {
                    Console.WriteLine("Congratulations, the book is available");
                }
            }
            else
            {
                if (checkOutHandlerMembers != null)
                {

checkOutHandlerMembers("Apologies, but the book is already

checked out to an existing Member.");

                }
                else
                {

Console.WriteLine("Apologies, but the book is

already checked out to an existing Member.");

                }
            }
        }
    }
}


The model created above is consumed in the console application.

class Program
    {
        static void Main(string[] args)
        {
            Library library = new Library();
            library.RegisterCheckOutHandlerMembers(OnCheckingOutEvent);            
            library.CheckOutBook(1, 1);
            
            Console.ReadLine();
        }
 
        public static void OnCheckingOutEvent(string message)
        {
            Console.WriteLine(message);
        }
    }


When executed the following output appears:

Broadcast of fulfillment of a conditionIn the output shown above, the program emitted certain messages related to the searching of the member and book details and successful checkout of the book. Now, remember, the domain is responsible for emitting the information, but what we do with the information is entirely in the hands of the developer. We can compose an email or an SMS and embed the emitted message or have it logged in a log file or a database.

Summary

Delegates help in separating the act of broadcasting information and how that information is consumed.
I hope this post helped in laying a strong foundation by presenting the concept of delegates in an easy to understand manner.

References

  1. Pro C# 8 with .NET Core 3 by Andrew Troelsen and Phil Japikse
  2. CLR via C# by Jeffrey Richter
blog comments powered by Disqus
ThinkingCog | May 2016

ThinkingCog

Articles written by Parakh Singhal

Running Redis in a Master-Slave Replication Setup

Key Takeaway:

Redis has the facility to setup replication with the help of master-slave configurations. A master can have multiple slaves and a slave can further have slaves. In this article we will focus on a simple setup having a single master and two slaves and will discuss a general usage pattern which would allow for a robust setup.

Read on:

Redis allows for configuration in two flavors:

1. With the help of a configuration file,

2. At runtime through commands.

In this article we will setup both the master and slaves with the help of configuration files, as that is something more understandable and how instances are configured in a production environment.

Download the Redis for Windows from MSOpenTech’s GitHub Release page for 64 bit architecture, or if you are having a 32 bit computer, please refer to my previous article on how to compile Redis for a 32 bit Windows environment. Put the folder having all the files needed to run Redis in C drive.

Next we are going to discuss some of the settings required to be implemented in the configuration files, one for each instance of Redis. The general architecture that I am trying to produce here looks something like the following:
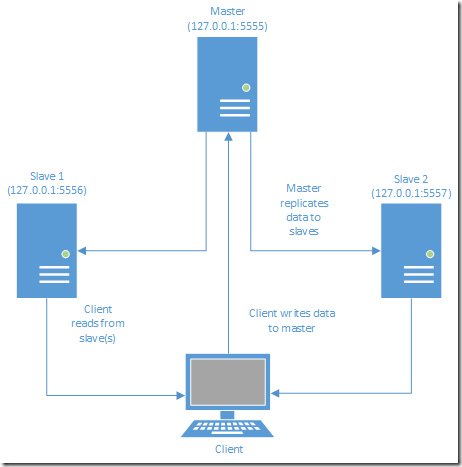
Master-Slave-Client Diagram


Figure 1 Redis replication basic architecture

Explanation of the architecture:

In Redis, master instance allows for both reads and writes, and in addition to that allows for disk persistence. Slaves, by default, are read only and allow for disk persistence. Over here, since this is just an introductory article, we are going to learn how to setup the simplest master-slave configuration. A more prudent setup would allow master to engage only with memory writes, and offload disk persistence to one of the slaves, and one or more slaves will dedicatedly handle the read queries. But we will discuss this in some later article.

In order to implement the aforementioned architecture we need to create three configuration files, one for master and one for each of the two slaves.

1. Nomenclature of configuration file:

It is important to name a Redis configuration file in such a way that the purpose and some vital information contained can be gleaned off from the name itself.

We will follow the pattern: redis.hosting environment.type of instance.purpose of instance.port number.conf

So a configuration meant for a master instance would bear the name like redis.windows.master.writes.5555.conf.

2. Creation of configuration files:

Redis master: Copy the configuration file that comes pre-packaged with Redis and rename it to redis.windows.master.writes.5555.conf, where 5555 is the port that will be dedicated to master instance. You can name it differently according to the port availability on your machine. Open the configuration in a text editor and change the default port from 6379 to the one that is available in your machine.
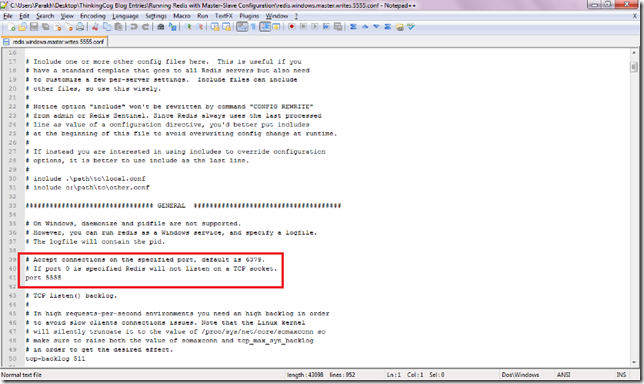
00 Master Configuration

Figure 2 Configure master instance to run on port 5555

Redis slave 1: Make a copy of the master’s configuration file and name it like redis.windows.slaveof5555.reads.5556.conf. Change the port in the file to 5556 or something that is available on your machine. Now search for the “Replication” section and un-comment the setting of “slaveof” and provide the IP address on which the master instance will be hosted and the port number. Since we will be just running all the three instances locally, the IP address should be 127.0.0.1 and the port number used in the master’s configuration file. The slave instance that we will run will take it’s configuration from this file.
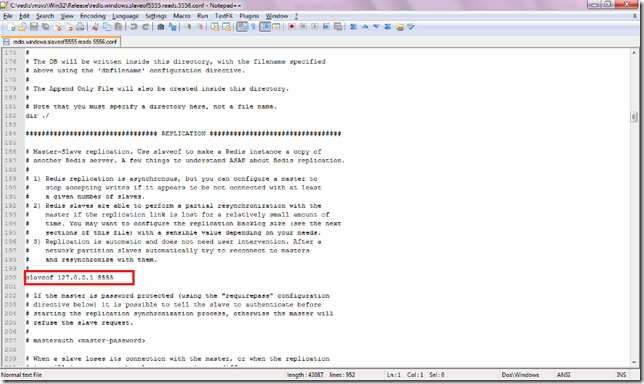
00 Slave Configuration

Figure 3 Configure slave instance to receive synchronization from master

Redis slave 2: Repeat the aforementioned steps, with the exception of changing the port number to 5557 or something that is available on your machine and accordingly use the same port in the name of the file. I have named mine to redis.windows.slaveof5555.reads.5557.conf.

3. Running instances

Redis master: Open a command prompt and navigate to the folder where you are having Redis executable files and execute redis-server.exe in conjunction with the name of the configuration where fro it is supposed to pick it’s configuration from.
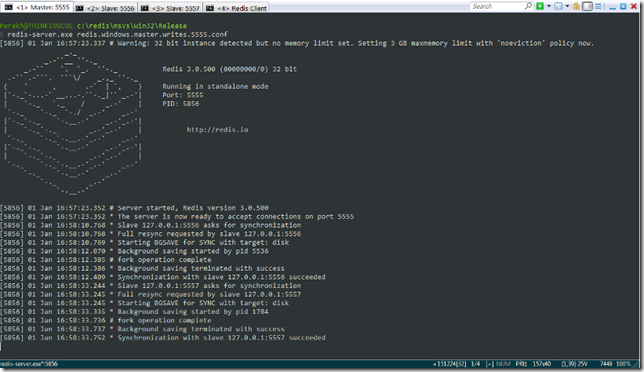
01 Redis Master

Figure 4 Master instance receives requests for data sync from slaves

Redis slave 1: Open another command prompt and again run the redis-server.exe file, this time specifying the slave configuration file. This will enable running a slave instance connected to the master. As soon as the slave instance will come up, the master will receive a request from slave for synchronization of data. This is shown in the screenshot.
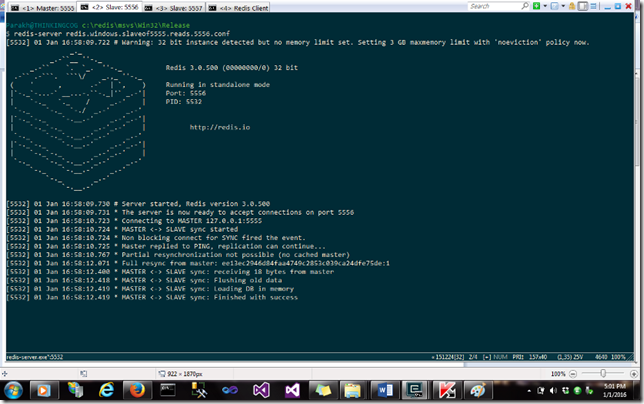
02 Slave 1

Figure 5 Slave 1 receives and syncs data with master

Redis slave 2: Repeat the aforementioned step for slave 1, but with the other configuration file meant for slave 2.
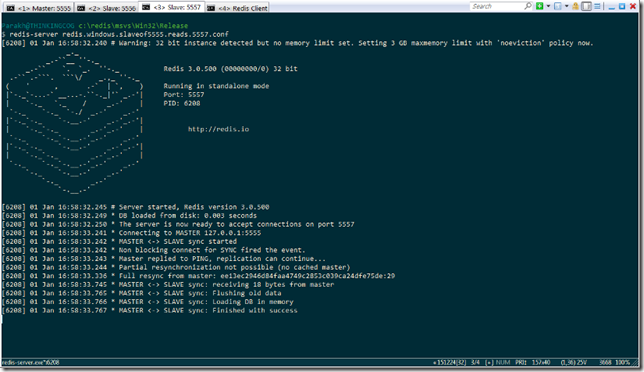
03 Slave 2

Figure 6 Slave 2

Now run another command prompt and run redis-cli.exe and connect to the master instance. Insert some keys in the master and query them, just to make sure, they have gotten stored. Now disconnect from the master instance and connect to the first slave hosted on port 5556 (or where you hosted it.) and query for the same keys, that you inserted in the master. You will find them. Similarly you will find the same information synchronized in slave 2.
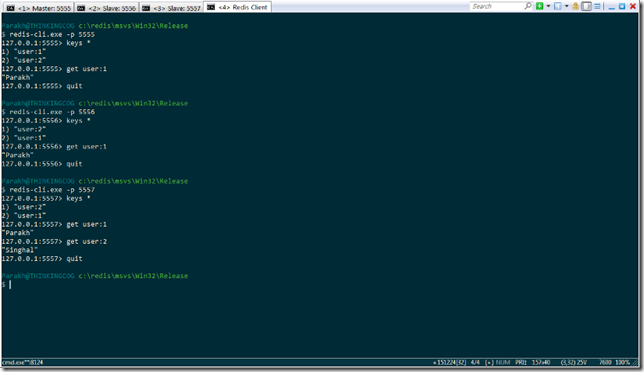
04 Redis Client

Figure 7 Redis client shows that master and slaves are at parity

Conclusion:

Running replication in Redis is very simple and minimal configuration. The pattern shown here, is elementary, just to give an idea about Redis replication. There are more robust architectures that should be used in production settings.