ThinkingCog

Articles written by Parakh Singhal

Git Revert vs. Reset

Introduction

We all make mistakes, and, it’s my belief that we all make an honest attempt to correct that mistake. If only, life was running on Git. Git offers two ways to rollback a change made to a codebase – revert and rese. In this article we will discuss the two commands and the scenarios in which they are apt to be used.

Basic Terminology

Before we embark on discussing the differences between the commands, it is prudent to discuss some basic terminology that will be instrumental in understanding the nuances of operations offered by these commands.
HEAD: Represents the last commit and is a pointer to the current branch selected in git.
INDEX: Represents the staging area aka the contents of the proposed next commit.
Working Directory: Contains all the files available in HEAD and INDEX and the artifacts that may never go in any commit. E.g. Assembly files (.dll, .exe) which do not get committed due to .gitignore settings.

Revert command

Sometimes it happens that wrong work gets committed and is pushed into the remote repository, making it available to the rest of the team, or project contributors, as the case may be. In such circumstances, it becomes imperative, that we introduce a context under which a rollback of the unintentional changes take place.

Revert offers just such functionality. It creates an opposite commit of the commit that you want to roll back. Such a rollback commit retains a detailed history of all the commits that came before it, thus avoiding all the confusion.

Run the following commands in bash shell to simulate a revert:

$ mkdir Revert
$ cd Revert
$ git init
$ touch file.txt
$ printf “First commit”>file.txt
$ git add file.txt
$ git commit -m “First commit”
$ touch file2.txt
$ printf “Second commit”>file2.txt
$ git add file2.txt
$ git commit -m “Second commit”
$ printf “\n\nThird commit”>>file.txt
$ git add file.txt
$ git commit -m “Third commit”
$ dir

Note that there are two files file.txt and file2.txt in the INDEX and working directory.

$ git status
$ git log –oneline

Note there are three commits. Now let’s revert the second commit. Since the file2.txt was created as part of the second commit, it should get deleted from the working directory and INDEX

$ git revert SHA1 hash corresponding to the second commit.
$ dir
$ git log –oneline
$ git status

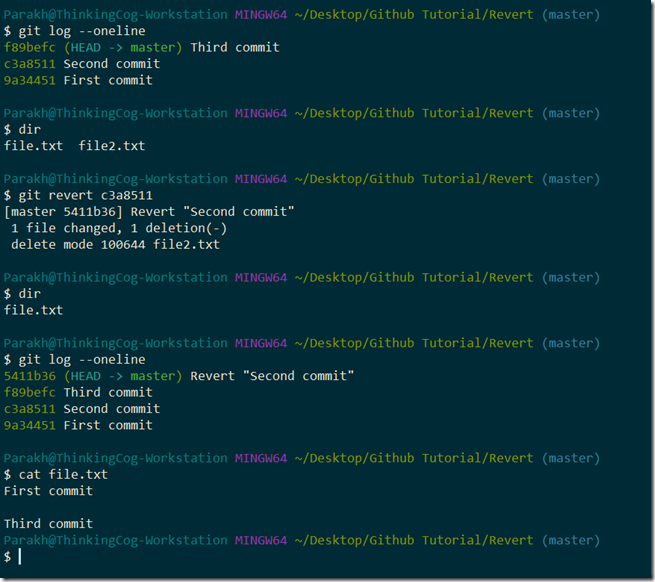
The result of following the aforementioned commands should look something like:
01 Revert Commit Log Cropped

As you see, now we have a total of four commits in the history, with the fourth one clearly jotted down as a revert commit, erasing the work done as part of the second commit.

Reset command

Reset is used when you have the fault available locally on your system and has not been pushed out to the remote repository. Now this command offers a further three flavors and it will be here that we will be chiefly leveraging the terminology covered earlier.
Soft Reset: This option moves the branch (that HEAD points to) to the commit mentioned, reinstating the conditions as they were when the commit was made. No changes are introduced in the INDEX (staging area) and working directory. This essentially does the same this as “git commit –amend” and offers us a chance to change what we need to.
This means that you will get a chance to amend the commit message. Note that no changes are introduced into the file(s) made prior to the rolled back commit in soft mode.
Mixed Reset: This option moves the branch (that HEAD points to) and INDEX (staging area) to the commit mentioned, reinstating the conditions as they were when the commit was made. No changes are introduced in the working directory.
Hard Reset: This option moves the branch (that HEAD points to), INDEX (staging area) and the working area to the commit mentioned, reinstating the conditions as they were when the commit was made. This is destructive in nature and should be used with caution as work is not recoverable after the issuance of this command.

NOTE: In none of the cases HEAD is moved to the mentioned commit. HEAD always point to the branch. It is the branch that is made to point to the pointer corresponding to the commit being reset.

Run the following commands in bash shell to simulate all three flavors of reset:

$ mkdir Reset
$ cd Reset
$ git init
$ touch file.txt
$ printf “First commit” > file.txt
$ git add file.txt
$ git commit -m “First commit”
$ printf “\n\nSecond commit” >> file.txt
$ git add file.txt
$ git commit -m “Second commit”
$ printf “\n\nThird commit” >> file.txt
$ git add file.txt
$ git commit -m “Third commit”
$ git status
$ git log –oneline
$ git reset --soft head~1

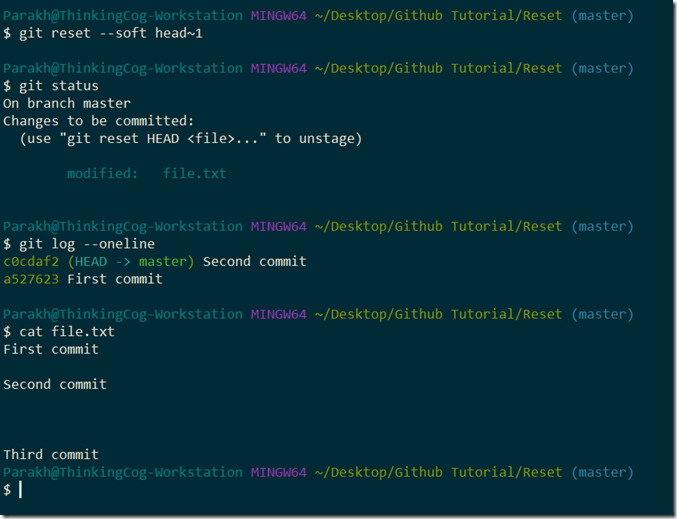
Now observe the changes made by the soft reset command

$ status
$ git log --oneline
02 Soft Reset

The following are the results of the soft reset:
1. The third commit has been rolled back as seen in the commit log,
2. No changes have been introduced in the INDEX i.e. the staging area. The git status helpfully suggests that file.txt is ready to be committed into the repository. The contents of the file.txt are the same as they existed prior to the rolled back commit,
3. No changes have been introduced in the working directory. All the contents are intact.

Let’s continue our example to mixed reset:

$ git add file.txt
$ git commit “Third commit”
$ git reset --mixed head~1

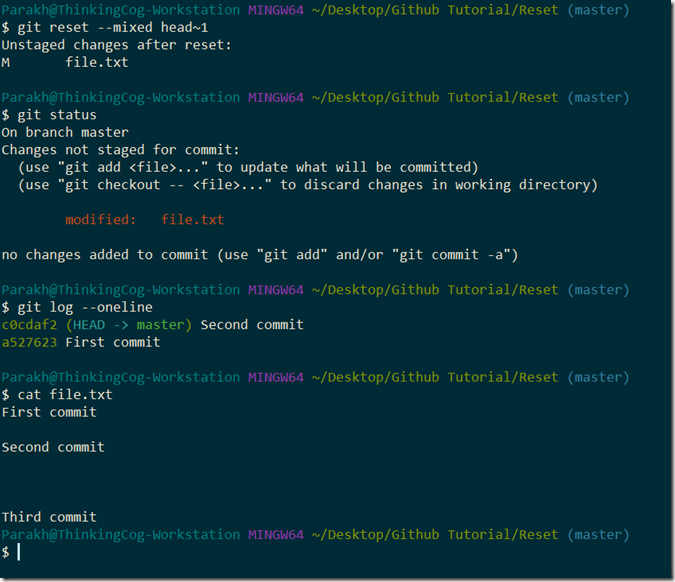
Now observe the changes made by the mixed reset command
03 Mixed Reset Cropped

The following are the results of the mixed reset:
1.    The third commit has been rolled back as seen in the commit log,
2.    Changes have been introduced in the staging area, as suggested by the status. It helpfully suggests that file.txt needs to be added in order for it to be committed.
3.    No changes have been introduced in the working directory.

Let’s continue our example to hard reset

$ git add file.txt
$ git commit “Third commit”
$ git reset --hard head~1

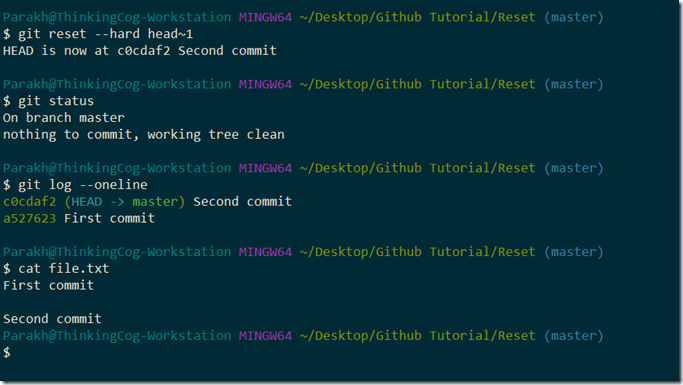
Now observe the changes made by the hard reset command
03 Hard Reset Cropped

The following are the results of the hard reset:
1. The third commit has been rolled back as seen in the commit log,
2. INDEX i.e. staging area has been put into the state as it existed after the second commit and prior to the third commit. The data corresponding to the third commit has been lost from the file.txt.
3. Working directory has been put into the state as it existed prior to the third commit. Any contents introduced between the second and the third commit would have been lost as part of the hard reset of the third commit.

Conclusion

Now that we have seen the difference between revert and reset and when the two should be used. We also saw the three modes made available by revert - soft, mixed and hard reset and how they affect the state of the working directory, INDEX and the content. Hard reset should be used with caution since the content is not recoverable after the issuance of the command.

References

1. https://git-scm.com/book/en/v2
2. https://www.atlassian.com/git/tutorials/resetting-checking-out-and-reverting

Git Rebase vs. Merge

Introduction

Every version control system offers a core set of functionalities, of which, the ability to create branches and then merge changes into branches are offered by both central and distributed version control systems. The way different systems behave is different and hence, often, while the result will be the merging of changes, the way it accomplished and the resulting history created are different.

Consider the following scenario:
You have created a feature branch from a long-running branch. Someone in the team commits in changes into the parent long-running branch and you have to bring in the changes into the feature child branch that you are using for active development. There are two ways to do that in Git:
1.    Merge command
2.    Rebase command

Both the commands achieve the same outcome of integrating the changes from parent long-running branch into the feature child branch. Where things differ, is the resulting commit history that gets created due to the usage of the commands.

Merge command

In the aforementioned scenario, if you use the merge command, the resulting commit history will bear a merge commit. Note that the merge command does not alter the history of your feature branch in any way. On the contrary, the merge commit provides a context for the changes bought from the parent branch.
Run the following commands in bash shell to simulate a merge in git to bring in changes from a parent branch to a child branch:

$ mkdir Merge
$ cd Merge
$ git init
$ touch file.txt
$ printf “First instalment of work done in master branch” > file.txt
$ git add .
$ git commit “First commit in master branch” 
$ git branch dev
$ git checkout dev
$ printf “\n\nWork done in dev branch” >> file.txt
$ git commit -am “First commit in dev branch”
$ git status
$ git checkout master
$ printf “\n\n\n\nSecond instalment of work done in master branch” >> file.txt
$ git commit -am “Second commit in master branch”
$ git checkout dev
$ git merge master
Resolve conflicts, if any. Perform a git commit which is going to be a merge commit.
$ git log –oneline –graph

The result will be something like shown in the image below:


Log history after a merge. Notice the merge commit made in the end

Figure 1 Log history after a merge. Notice the merge commit made in the end

Rebase command

Rebase command, as the name suggests re-creates the base for the child branch while bringing in the changes from the parent branch. This results in a cleaner, unidirectional history, but the context under which the changes were bought in, gets lost. It appears that the child feature branch always worked with the changes bought from the parent long-running since the beginning of its creation.

Run the following commands in bash shell to simulate a rebase in git to bring in changes from a parent branch to a child branch:

$ mkdir Rebase
$ cd Rebase
$ git init
$ touch file.txt
$ printf “Work done in master branch” > file.txt
$ git add .
$ git commit -m “First commit in master branch”
$ git branch dev
$ git checkout dev
$ printf “\n\nWork done in dev branch” >> file.txt
$ git commit -am “First commit in dev branch”
$ git checkout master
$ printf “\n\n\n\nSecond instalment of work done in master branch” >> file.txt
$ git commit -am “Second commit in master branch”
$ git checkout dev
$ git rebase master
Resolve conflicts, if any. Perform a git add . followed by git rebase –continue
$ git log –oneline –graph


The result will be something like shown in the image below:

Log history after a rebase. Notice the second commit from master inserted as a base commit for dev branch

Figure 2 Log history after a rebase. Notice the second commit from master inserted as a base commit for dev branch

Conclusion

The net outcome of both the rebase and merge command as seen above is the same i.e. integration of changes from one to another branch, here parent to child branch.
 
Now, naturally, the question arises as to when to use what.
 
Merge is a non-destructive operation that preserves the chronological order of commits verbatim. The merge command creates a merge commit which brings in a convergence point into the commit history, thereby, bringing in the context under which the integration of changes occurred. This is essential when you are working on a public project and want every developer to have a shared context.
 
Rebasing a feature branch with changes bought from the long-running parent branch creates a clean linear history in the feature branch. But this eliminates the context under which the activity of rebasing was done. It is preferred when you are working as part of a small team and, it is relatively easy to collaborate and communicate with all the developers about the changes done to the feature branch.

References

1.    https://git-scm.com/book/en/v2
2.    https://www.atlassian.com/git/tutorials/merging-vs-rebasing
3.    https://medium.com/datadriveninvestor/git-rebase-vs-merge-cc5199edd77c

How to Operate Multiple GitHub Accounts from a Single Computer

Developers love to use a single computer for all their needs, whether they are related to office work or work on their personal projects. Since using version control is a cardinal requirement in any software project, personal or professional, it becomes imperative that a requirement arises, whereby, a developer is required to operate multiple GitHub accounts from a single computer.

Consider a scenario that you have two GitHub accounts – one sponsored by your employer and the other one personal and you want to use a single computer to operate both of them. This is possible by virtue of SSH keys and setting remote repositories under the correct SSH key. The following is the broad outline of the article:

1. Setting up SSH keys

2. Setting up a configuration file to use easily co-ordinate among multiple accounts

3. Setting remotes correctly

1. Setting up SSH Keys

SSH keys generated using RSA algorithm, generates a pair of keys – public and private. Per the norm, the private key remains secure with you and never travel over the wire, while public key is distributed for verification. In this case the public key is stored in your GitHub account.

On Window 10 open Git Bash, navigate to C:\Users\YourMSID\.ssh and key in the following command:

$ ssh-keygen -t rsa –b 4096 -C "your personal email address"


This will prompt you to create a new file. Provide a suitable name to the file so you are able to differentiate between various files and hence various keys. Also make sure to enter a suitable passphrase. Providing passphrase further encrypts the private SSH key using a symmetric encryption algorithm, and will render the theft of the private key useless.

Now generate a key-pair for the official account in a manner similar to described above:

$ ssh-keygen -t rsa –b 4096 -C "your official email address"


The next step after the generation of the key-pair will be to copy over the public SSH keys into respective GitHub accounts. I am assuming a generic name generally given to key-pair given to personal accounts. Print on the screen and copy the relevant section:

$ cat id_rsa_personalaccount.pub


Make sure that you copy the key that starts with “ssh-rsa” and ends with gibberish. Do not copy the email part.

Now navigate to your personal GitHub account and open account settings. Open the “SSH and GPG Keys” section. Click on “New SSH Key”, and copy over the key. Make sure to give a suitable title to remember the computer that the key is present on. You may generate a key on some other computer tied to your personal account. A suitable title will help you connect the key and the originating computer where it came from.

Perform the same routine for the SSH key corresponding to your official account with corresponding account on GitHub.

2. Setting up a configuration file to use easily co-ordinate among multiple accounts

Now to make life easy with multiple keys stored on a single computer, we will create a configuration file containing the details about the hostname which needs to be connected to and the account details with which to authenticate. Create a config file with the following command:

$ notepad config


And copy over the following details:

# Personal
Host personal
HostName github.com
User git
IdentityFile ~/.ssh/id_rsa_personalaccount

# Work
Host work
HostName github.com
User git
IdentityFile ~/.ssh/id_rsa_workaccount

One very important thing to note here is to provide the hostname as given in the sample configuration and the user as “git” in both the cases.

The next step will be to make sure that SSH agent is running on the machine. Run the following command on bash shell to make it run in the background:

$ eval $(ssh-agent -s) 

This will start the SSH agent of it is not running in the background and will allocate it a process identifier. Now we will add the SSH keys for personal and professional accounts to the agent by the following command:

$ ssh-add id_rsa_personalaccount

$ ssh-add id_rsa_workaccount

If you had provided passphrases while creating the SSH keys, then you will have to provide the corresponding passphrases before adding them to the agent.

In order to make sure that we have indeed added the identities, run the following command:

$ ssh-add –l

Now that we have the keys added in the SSH agent and have the configuration file set up, we are in a position to test the authentication by connecting to GitHub with credentials as described in the config file. Ru the following command:

$ ssh –T personal

The aforementioned command will make ssh module take the config file placed in the .ssh folder by default and use host information defined therein. The result of executing the commands should be something like below:

Hi parakh! You've successfully authenticated, but GitHub does not provide shell access.

Repeat the process for the work account.

3. Setting remotes correctly

Now that we are done setting up the keys and configuration file, and have tested the authentication, we will create a dummy repository and push the changes to it. On GitHub, create a dummy repository, say, with the name DummyRepo. This will be the repository which we will use to upload our changes to, and pull the changes from. Navigate to a suitable location on your hard drive and run the following commands to create a repository mapped to DummyRepo:

$ mkdir DummyRepo
$ git init
$ touch file1.txt
$ printf “This is my file” >; file.txt
$ git add .
$ git commit -m "first commit"
$ git remote add origin git@personal:UserNameOfPersonalAccountAtGitHub/DummyRepo.git
$ git push origin master

If all the setup has been done correctly, then the push of changes to DummyRepo will succeed. Now test the pull from the repository. Create a text file over at the GitHub repository and commit it. Now run the following commands:

$ git pull origin master

This should succeed in pulling the newly created file and commit.

Hope this article was helpful to you.