In my last post, I described the simplicity that SignalR brings to table when we want to include real time asynchronous communication between server and client(s) in our application. In this post I will make a simple application, the proverbial ‘Hello World’ kind of application to introduce the basic concepts of this new library.
The following are the pre-requisites for the application:
1. Visual Studio 2012
2. .NET Framework 4.5
3. ASP.NET and Web Tools 2012.2
The best thing about the web tools update 2012.2 is the included template that makes adding SignalR capabilities to your project amazingly easy. Our website will be based on ASP.NET Web forms and will use JavaScript client, which comes in the form of a jQuery plugin. So let’s start.
1. Fire up your Visual Studio and make a new empty ASP.NET Web forms web site.
2. Right click on the website and add a SignalR Hub class and provide “HelloWorld” as the name for the hub class. This will add the following items in the website:
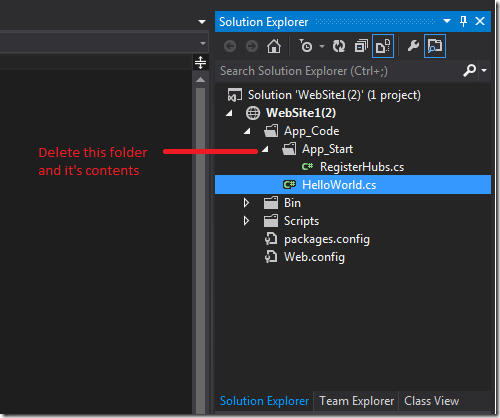
a) App_Code folder – which will house our hub class and the App_Start folder which contains the RegisterHubs.cs file, housing the code that maps the hubs available at application startup.
b) Scripts folder which houses all the JavaScript files, including the bundled jQuery library and the JavaScript client based upon the jQuery library.
c) Bin folder housing all the necessary assemblies that co-ordinate things on the server side. This also contains the JSON serializer Json.NET.
d) packages.config which lists all the external dependencies.
Now we will have to change this setup a little bit in order to make it work in a web forms website. Remove the App_Start folder and the containing RegisterHubs.cs file from it. The App_Start folder is something that the MVC website can use to execute code at application startup. Web form website uses Global.asax to do just the same. I believe this a template error, and will be corrected out in future releases.

3. Add a Global.asax file to the solution. The HTML portion of your Global.asax file should look like this:
<%@ Application Language="C#" Inherits="Global" CodeBehind="~/App_Code/Global.asax.cs"%>
<script runat="server">
</script>
and the code behind portion should look like this:
using System;
using System.Collections.Generic;
using System.Linq;
using System.Web;
using System.Web.Routing;
using Microsoft.AspNet.SignalR;
/// <summary>
/// Summary description for Global
/// </summary>
public class Global:System.Web.HttpApplication
{
void Application_Start(object sender, EventArgs e)
{
// Code that runs on application startup
RouteTable.Routes.MapHubs();
}
Explanation of code:
Note that we are required to include System.Web.Routing and Microsoft.Aspnet.SignalR namespaces and make the Global class inherit from System.Web.HttpApplication class.The purpose of having RouteTable.Routes.MapHubs is to map the hubs available to the client to a special default address: /signalr/hubs. If you want to configure the availability of hubs to a special address then you will have to provide custom address in the MapHubs as a string parameter. e.g. RouteTable.Routes.MapHubs(“~/signalr2”).
4. Now head over to the hub class and add the following code:
using System;
using System.Collections.Generic;
using System.Linq;
using System.Web;
using Microsoft.AspNet.SignalR.Hubs;
public class HelloWorld : Hub
{
public void Hello()
{
Clients.All.hello();
}
}
Explanation of code:
The main thing to notice here is the inclusion of the namespace Microsoft.Aspnet.SignalR.Hubs and derivation of the hub class HelloWorld from parent class Hub. From the perspective of the client and server model, this is the class that aptly serves as a hub and will receive all the communication from the client(s) and further the same to other client(s) or take some action on the server side. In code, we are declaring that there is a server side method called “Hello” which when executed will execute a method called “hello”, available to all the clients.
5. Now add an HTML page and add the following code in it.
<!DOCTYPE html>
<html xmlns="http://www.w3.org/1999/xhtml">
<head>
<title>Hello World! with SignalR</title>
<script src="Scripts/jquery-1.7.1.min.js"></script>
<script src="Scripts/jquery.signalR-1.0.0-alpha1.min.js"></script>
<script src="/signalr/hubs" type="text/javascript"></script>
<script type="text/javascript">
$(document).ready(function () {
//defining hub which will have client and server side methods defined.
var hub = $.connection.helloWorld;
//defining what the client side "hello" method should do when called.
//by the server side code.
hub.client.hello = function () {
$('#AddText').append('Hello World!<br />');
}
//starting the hub and specifying what should server side code should be
//called when a certain client side event occur.
$.connection.hub.start().done(function () {
$('#SubmitButton').click(function () {
hub.server.hello();
});
});
});
</script>
</head>
<body>
<div id="AddText"></div>
<input type="button" id="SubmitButton" value="Say Hello" />
</body>
</html>
Explanation of code:
Here we reference all the necessary JavaScript libraries among which are the jQuery library and SignalR JavaScript client based on jQuery. There is one special JavaScript reference “/signalr/hubs” which is the JavaScript that is dynamically generated at client side and referenced by DOM at runtime. The body of the HTML document consists of a div element bearing id “AddText” to which we will add text “Hello World!” each time the button “Say Hello” is pressed. The jQuery code for this example is very simple. In it we declare the name of the hub class. Note that we are using camel casing as per JavaScript coding conventions to refer to our server side hub class. Thus “helloWorld” at client side is “HelloWorld” at server side. We then define that the client side “hello” method which is actually adding the text “Hello World!” and a line break to the div element “AddText”. We then start the connection and when done, observes the click event of the “Say Hello” button. When the click event happens on the client side, we execute the server side method “Hello” of the hub class, which in turns executes the “hello” method available at all the clients. This adds text to the div element at all clients.
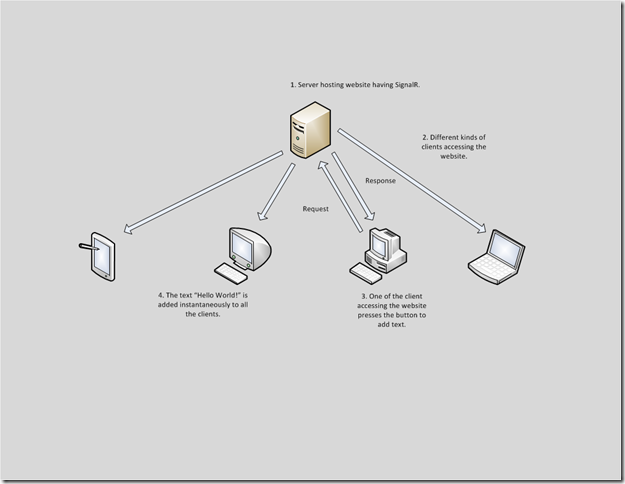
Speaking diagrammatically, this is what we are aiming to do:

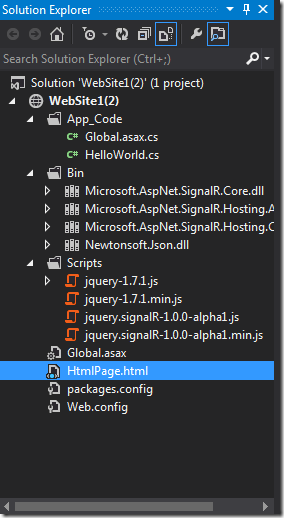
In the end the code hierarchy should look like in the following image with all the code in the right place.

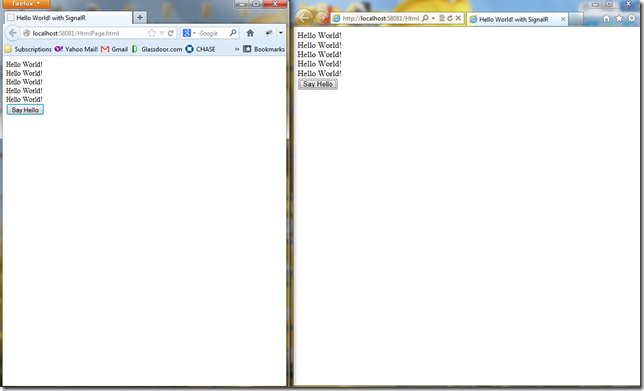
6. As the last step start debug and run the website in IIS Express. Open the website in multiple different browsers and press the “Say Hello” button. It will add text “Hello World!” in all the browsers simultaneously in real time.

Website running in IE9 and Firefox, receiving instructions from server in real time.
The code example presented here has been deliberately kept simple to prime the reader of the basic concepts of this new library.
In a nut shell we achieved:
1. Real time communication between server and client(s).
2. Auto negotiation of protocol (WebSocket, forever frames, long polling etc.) between the client(s) and server.
3. Simple, unified programming interface built upon C# (server side) and jQuery (client side in ASP.NET).
Download code:

In the next post I will demonstrate a more involved example, utilizing jQuery UI. Stay Tuned.