Key Takeaway
Raspberry Pi is an experimenter’s dream come true. It offers light to medium computing power in a small form factor with all the bells and whistles like Wi-Fi, Ethernet, Bluetooth, USB 2.0 ports etc. Further augmenting a tinkerer’s abilities are the software capabilities, which now stand further extended due to the introduction of .Net Core which allow you to leverage your existing background with Visual C# and run code on ARM architecture. In this post we will take a look at all the steps that one has to perform to run code created using Visual C# and targeting .Net Core on a Raspberry Pi 3.
Read On
.Net Core is a cross platform offering from Microsoft which allows you to run your C# code on multiple hardware (x86, x64, ARM etc.) and software platforms (Windows, Linux and macOS). Of course, it does not provide universal coverage, and at the time of writing this post, industrial grade long-term support versions of operating systems are being targeted with higher priority by Microsoft. It is natural, after all those are the operating systems that organizations would be using to run their applications.
But there’s something about frugal engineering and Raspberry Pi is a prime example of that. With support from the community, it is possible to have the code made targeting .Net Core, be run on Raspberry Pi 3. Here are some of the points that you may want to read before going any further:
1. Note that the compilation targeting ARM hardware (ARM32) for both Linux and Windows software platforms are not being officially supported by Microsoft. So, have justified expectations and be prepared to get your hands dirty with some virtual dirt. See their official statement here.
2. At the time of writing this post, it is only possible to run .Net Core code on Raspberry Pi 2 and 3, and not on Pi Zero. This is because .Net Core at the moment targets ARMv7 instruction set and above for ARM architectures. Raspberry Pi 3 uses a Broadcom BCM2837 chip which uses ARMv8 instruction set, while Raspberry Pi Zero uses BCM2835 chip which uses ARMv6 instruction set. See the official statement here.
3. There is no Software Development Kit (SDK) available at the moment that helps you develop software on Raspberry Pi for Raspberry Pi, so you will have to develop your code on a supported development environment and then copy over to Pi for execution.
Alright, if you have made this far, I am assuming that you want to give it a go.
Creation of a console application
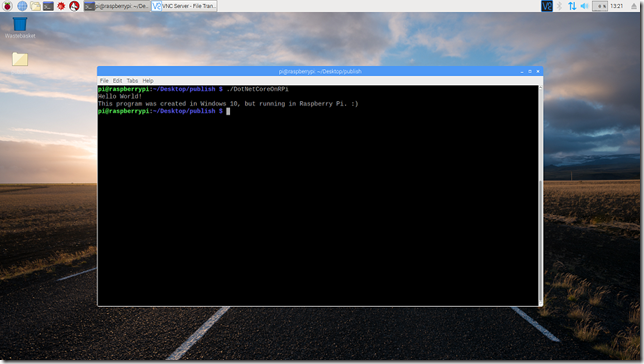
First let’s develop our application and since this will be the first time we will be running a .Net Core project in Raspberry Pi, let’s keep things simple. Fire up your Visual Studio and then create a new console application project. I named mine as “DotNetCoreOnRPi”. Just so that we can easily identify that the things are working as desired, add a line in your main program:
Console.WriteLine("This program was created in Windows 10, but running in Raspberry Pi. :)");
Save your program and open the developer console and navigate to the folder containing your project.
Any application targeting .Net Core can be executed either as a self-contained application (Self-contained deployment) packing all the assemblies that its execution depends upon, or as an application depending on the .Net Core framework (Framework-dependent deployment). You can read more about that here. We will publish our application as a self-contained application on Raspberry Pi.
Self-contained deployment
In order for the application to execute in a supported operating system, it still needs some functionality that is supported by the targeted operating system. Raspbian Stretch operating system, the official operating system supported by the Raspberry Pi Foundation, comes missing just one essential package. Run the following code to install the “libunwind” package.
sudo apt-get install curl libunwind8 gettext
Once done we need to return to our developer prompt and publish the project targeting the “linux-arm” platform by using the following line of code:
dotnet publish -r linux-arm
This will create a folder in the bin/Debug/netcoreapp2.0 named “linux-arm”. Within the linux-arm folder will be a folder named “publish”.
Copy the entire publish folder at a suitable location in your Pi. Open a terminal window and navigate to the publish folder. Make sure that you have the appropriate permission to execute the application. You can use the following command to grant the execution permission:
chmod 755 ./DotNetCoreOnRPi
Then execute the application by using the command:

For now, all the official and un-official documentation points to the fact that framework-dependent deployments are not supported. Let’s hope that Microsoft starts supporting Arm32 builds officially and we can reduce the size of our deployments by relying on the .net core framework available on a system-wide basis.