ThinkingCog

Articles written by Parakh Singhal

Inserting Multiple Rows in SQL Server via Table Valued Parameters

Key take away:

In my last posts, I have described ways to insert multiple rows worth of data in a SQL Server database via a Comma Separated List and XML. In this post I will describe how to insert multiple rows from a .Net application using the most preferred way, a native feature in SQL Server, Table Valued Parameters.

Read on:

A short introduction to Table Valued Parameters:

Parameters are place holder for values that are passed from various constructs outside of a programming artifact. We declare parameters all the time, in various technologies, and in various forms - command line arguments, query string values in ASP.NET, sql parameters that carry information to database in a type safe way, etc. In SQL Server parameters are the way to pass and receive information that needs to be dealt with, and information can come from either within SQL Server or outside of SQL Server like from a .Net application. Parameters are generally made of a primal data type like int, char, varchar etc. When such parameters are modeled on some pre-defined table type, such parameters are called Table Valued Parameters. The important words to note here are “table type”. Not table, but table type, which means a user defined type based on some table structure.

Table Valued Parameters have been supported by SQL Server since version 2008.

To demonstrate the concept of TVPs, I will be using a very simple data model consisting of three tables: Student, Course and an association table supporting many-to-many relationship between Student and Course, StudentCourse.

The Entity-Relationship diagram will clarify the relationship between the tables:

ERD diagram:

ERD diagram


According the ER diagram, a student can take many courses and a course can be taken by many students. The insertion of courses that a student is interested in the association table is an ideal application of this technique.

Now consider the following code to make a table type. this type will be used to model a table valued parameter on the table type:

   1:  CREATE TYPE StudentCoursesTableType AS Table
   2:  ([StudentID] [int] NULL,
   3:   [CourseID] [int] NULL);


Making a table type makes the type available in the User-Defined Table Types sub-section of Types section.

clip_image002


Execution of the following code should give you some result depending on what you have available in the StudentCourse table.

   1:  Declare @StudentCoursesTVP as StudentCoursesTableType;
   2:   
   3:  Insert into @StudentCoursesTVP(StudentID, CourseID)
   4:  Select [StudentID], [CourseID] from [dbo].[StudentCourse];
   5:   
   6:  Select * from @StudentCoursesTVP;


clip_image002[5]


So now that we are through with the basics of TVP, let’s see how we can use them in our main purpose of processing multiple rows of data. To demonstrate this, I will be using a simple web form application powered by the same data model discussed above. The application helps a student get enroll in the course(s) of his/her choice.

clip_image004


The coding for the webpage is very simple. The pseudo-code is as follows:

1. Select a student from the drop down.

2. Select from the available courses that the student needs enrollment for.

3. Click on the submit button.

I am going to leave it up to the reader to understand the programming in the web application. It is straight forward and the domain model powering the application is a reflection of the data model depicted above.

The main work is being done at two places:

1. Web application’s repository method which parses the incoming object data into a datatable.

2. The stored procedure responsible for receiving the data in the form of a table valued parameter and using it to feed data into the desired table.

Consider the following repository method in the StudentSQLRepository class:

   1:  public int GetEnrolled(List<Course> courses, int studentID)
   2:          {
   3:              DataTable table = new DataTable("data");
   4:              table.Columns.Add("StudentID");
   5:              table.Columns.Add("CourseID");
   6:              foreach (Course course in courses)
   7:              {
   8:                  table.Rows.Add(new object[] { studentID, course.CourseID});
   9:              }
  10:              string sql = @"dbo.EnrollStudentInCourses";
  11:              int result = 0;
  12:              SqlParameter studentCoursesTVP = new SqlParameter("StudentCoursesTVP", table);
  13:              studentCoursesTVP.SqlDbType = SqlDbType.Structured;
  14:              using (SqlConnection connection = new SqlConnection(connectionString))
  15:              {
  16:                  using (SqlCommand command = new SqlCommand(sql, connection))
  17:                  {
  18:                      command.CommandType = CommandType.StoredProcedure;
  19:                      command.Parameters.Add(studentCoursesTVP);
  20:   
  21:                      connection.Open();
  22:                      result = command.ExecuteNonQuery();
  23:                      connection.Close();
  24:                  }
  25:              }
  26:              return result;
  27:          }

There are two noteworthy points in the code above:

1. We are passing the datatable to the SQL Server database to be processed. The datatable is modeled on the table type present in the SQL Server database, used by the table valued parameter.

2. The SqlDbtype of the SqlParameter is set to Structured type. This is strictly done to improve the readability of our code and convey meaning in an explicit way. ADO.NET will perfectly parse the datatable correctly had we not declared the SqlDbType to Structured explicitly.

Following is the SQL script of the dbo.EnrollStudentInCourses responsible for parsing the data in the @StudentCoursesTVP table valued parameter correctly.

   1:  CREATE PROCEDURE [dbo].[EnrollStudentInCourses]
   2:      
   3:      @StudentCoursesTVP StudentCoursesTableType readonly
   4:   
   5:  AS
   6:  BEGIN
   7:   
   8:      Insert into StudentCourse (StudentID, CourseID)
   9:      Select StudentID, CourseID from @StudentCoursesTVP    
  10:      
  11:  END
  12:   
  13:  GO


If you go and read my two other posts on inserting multiple rows using a comma separated values list and XML, you surely will come to the conclusion that using table valued parameters is the cleanest approach, that doesn’t include any code acrobatics either in .Net code or in SQL code. Not only that, table valued parameters code is highly performant as long as there’s reasonable data involved.

The sample code for this post can be downloaded from the following location:

References:

1. Table Valued Parameters at TechNet

Inserting Multiple Rows in SQL Server via a XML

Key take away:

My last two posts touched on the two methods available in SQL Server to flatten hierarchical XML data into flat relational form. In this post I will build upon those concepts and will cover how to leverage them to insert multiple rows worth of data into a SQL Server database in a single call.

Read on:

Hierarchical XML data can be flattened at SQL Server database level using one of the two ways:

1. OPENXML method

2. Nodes method

One of the reason why we would want to convert XML data into relational data at database level is to push in multiple rows worth of data to be inserted into a single or multiple tables in a single database call. Opening and closing a connection to a database for doing operation can be a costly affair for a website storing a sizeable amount of data at every call. The cost can be minimized by sending all the related data in a single call and parsing it out into distinct rowsets and storing them in the desired table(s). This scenario is especially true when you provide editing capabilities in a tabular or gridview kind of an environment and allow user to check in all the changes in one button click.

The technique of storing multiple rows with the help of XML works on the following strategy:

1. Convert the information into XML hierarchy.

2. Pass the XML to SQL Server.

3. Parse the hierarchy via one of the methods – OPENXML or nodes method and convert it into relational form.

4. Parse the relational form and store it via normal insert query.

To demonstrate I will be using a very simple data model consisting of three tables: Student, Course and an association table supporting many-to-many relationship between Student and Course, StudentCourse.

The Entity-Relationship diagram will clarify the relationship between the tables:

ERD diagram


According the ER diagram, a student can take many courses and a course can be taken by many students. The insertion of courses that a student is interested in the association table is an ideal application of this technique.

The following ASP.NET webform that is the web front end that we will use to form a complete example to demonstrate this approach:

image


The coding for the webpage is very simple. The pseudo-code is as follows:

1. Select a student from the drop down.

2. Select from the available courses that the student needs enrollment for.

3. Click on the submit button.

I am going to leave it up to the reader to understand the programming in the web application. It is straight forward and the domain model powering the application is a reflection of the data model depicted above.

The main work is being done at two places:

1. Web application’s repository method which does the work of making a hierarchical XML data from the objects.

2. The stored procedure that converts incoming XML data into relational data and stores it into table.

Consider the following repository method:

   1:  public int GetEnrolled(List<Course> courses, int studentID)
   2:          {
   3:              DataTable table = new DataTable("data");
   4:              table.Columns.Add("StudentID");
   5:              table.Columns.Add("CourseID");
   6:   
   7:              foreach (Course course in courses)
   8:              {
   9:                  table.Rows.Add(new object[] { studentID, course.CourseID});
  10:              }
  11:   
  12:              string data;
  13:              using (StringWriter sw = new StringWriter())
  14:              {
  15:                  table.WriteXml(sw);
  16:                  data = sw.ToString();
  17:              }
  18:   
  19:   
  20:              string sql = @"dbo.EnrollStudentInCourses";
  21:   
  22:              int result = 0;
  23:   
  24:              SqlParameter xml = new SqlParameter("XML", data);
  25:   
  26:              using (SqlConnection connection = new SqlConnection(connectionString))
  27:              {
  28:                  using (SqlCommand command = new SqlCommand(sql, connection))
  29:                  {
  30:                      command.CommandType = CommandType.StoredProcedure;
  31:                      command.Parameters.Add(xml);
  32:   
  33:                      connection.Open();
  34:                      result = command.ExecuteNonQuery();
  35:                      connection.Close();
  36:                  }
  37:              }
  38:   
  39:              return result;
  40:          }


The point of interest in the code mentioned above are the lines that push the object data into a datatable and the code that converts the datatable into an XML hierarchy. Please note that the hierarchy will include the name of the datatable that gets set in the .Net code. So please name it appropriately. The resulting XML hierarchy looks something as shown below:

   1:  <DocumentElement>
   2:      <data>
   3:          <StudentID>1</StudentID>
   4:          <CourseID>4</CourseID>
   5:      </data>
   6:      <data>
   7:          <StudentID>1</StudentID>
   8:          <CourseID>5</CourseID>
   9:      </data>
  10:      <data>
  11:          <StudentID>1</StudentID>
  12:          <CourseID>6</CourseID>
  13:      </data>
  14:  </DocumentElement>

It is this XML that gets passed to the SQL Server and is de-serialized into relational form using the nodes method. I have discussed the fundamentals of the nodes method in my last post. The de-serialization can also be carried out by using the OPENXML method.

The core of the dbo.EnrollStudentInCourses stored procedure, responsible for recording the course enrollment data for a student is made of the following code:

   1:  Insert into StudentCourse (StudentID, CourseID)
   2:  SELECT
   3:  data.value('(StudentID/text())[1]','int') as StudentID,
   4:  data.value('(CourseID/text())[1]','int') as CourseID
   5:  FROM @XML.nodes('/DocumentElement/data')
   6:  as StudentCourses(data)
 

NOTE: The SQL code is made keeping in mind the name of the datatable used to capture the data in the .Net code.

The sample code for this post consists of the web application and the powering database. Download it from:

Inserting Multiple Rows in SQL Server via a Comma Separated Values List


Key takeaway:

Frequently there are scenarios here you might be required to key in multiple rows into a SQL Server database table. In order to do that with minimum number of calls and a low memory footprint, there are several approaches available. I know of three, of which I am presenting the comma separated values (CSV) list approach.

Read on:

A few days ago, I ran into a requirement that required me to insert multiple rows of data into a table in a SQL Server database. There are a couple of approaches to do this and I am planning to do a series on this. Some of the approaches to do this are the following:

1. Passing a comma separated value (CSV) list to the database and parsing it at the database level with the help of a user defined function to split the list into rows and inserting those rows.

2. Passing the data as XML hierarchy,

3. Using Table Valued Functions, a feature that SQL Server supports version 2008 onwards.

All the three approaches are valid approaches and usage depends upon the kind of constraints that you are operating with. I was dealing with a legacy codebase, that did not afforded me the luxury of table valued parameters, which is the most straight forward and efficient way of accomplishing this, and had to settle for the CSV list and eventually the XML way.

In this post I will be covering the CSV list method. The comma separated values list method requires the following main ingredient: a user defined function that can be used to split text on the defined delimiter. Since this post is all about demonstrating the comma separated values list approach, I will not delve into the internal mechanics of such function. I just grabbed the first function that I could get off of the internet, and made it work.

I got the split function from the following url: SQL Server Forums - Best split function courtesy of the member Corey alias Seventhnight.

The technique works on the following strategy:

1. Parse the information that needs to be stored in the database in the form of a CSV list.

2. Pass it to the database packed in an appropriate type of parameter.

3. De-serialize the information into a table variable with the help of the aforementioned splitter function.

4. Depending upon the total number of columns in the target table, run a combination of insert and update commands, fetching the information from the table variable. A combination is made this way in order to minimize the disk activity, and complete the operation in as short duration as possible.

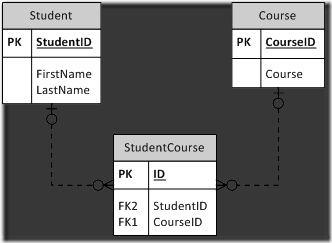
To demonstrate I will be using a very simple data model consisting of three tables: Student, Course and an association table supporting many-to-many relationship between Student and Course, StudentCourse. The Entity-Relationship diagram will clarify the relationship between the tables:
clip_image002


According the ER diagram, a student can take many courses and a course can be taken by many students. The insertion of courses that a student is interested in the association table is an ideal application of this technique.

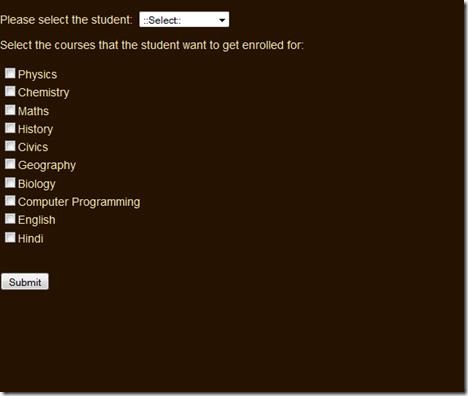
The following ASP.NET webform that is the web front end that we will use to form a complete example to demonstrate this approach:
clip_image004


The coding for the webpage is very simple. The pseudo-code is as follows:

1. Select a student from the drop down.

2. Select from the available courses that the student needs enrollment for.

3. Click on the submit button.

I am going to leave it up to the reader to understand the programming in the web application. It is straight forward and the domain model powering the application is a reflection of the data model depicted above.

All the magic happens in the stored procedure powering the enrollment of a student in one of the listed courses. The stored procedure is as follows:

   1:  CREATE PROCEDURE [dbo].[EnrollStudentInCourses]
   2:   
   3:  @StudentID int,
   4:   
   5:  @Courses nvarchar(max)
   6:   
   7:  AS
   8:   
   9:  BEGIN
  10:   
  11:  Declare @TempStudentCourseTable Table
  12:   
  13:  (
  14:   
  15:  StudentID int null,
  16:   
  17:  CourseID int null
  18:   
  19:  );
  20:   
  21:  Insert into @TempStudentCourseTable (CourseID)
  22:   
  23:  Select CONVERT(int,Data) from dbo.Split(@Courses,',');
  24:   
  25:  Update @TempStudentCourseTable Set StudentID = @StudentID;
  26:   
  27:  Insert into dbo.StudentCourse (StudentID,CourseID)
  28:   
  29:  Select StudentID,CourseID from @TempStudentCourseTable;
  30:   
  31:  END
  32:   
  33:  GO
  34:   


The pseudo-code for the stored procedure is as follows:

1. There are two parameters in the stored procedure – The student ID of the student, who needs to be enrolled, and the courses passed as an nvarchar(max) parameter representing a CSV list of the courses in which the enrollment needs to be done.

2. The procedure uses a table variable that mimics the table structure of the StudentCourse table, sans the primary key.

3. Insert command is carried out on the table variable, with the CSV list comprised of the courses passed to the splitter function. Since out splitter function returns a table, with two columns – ID (int type identity column), and Data (nvarchar type), we can right away leverage the Data field, and insert it into the table variable by carrying out required conversion on the fly. Here I am converting the Data to integer, since CourseID is of type int.

4. Once the insertion has been done, I update the StudentID field in the table variable with the passed parameter value.

5. Once this is complete, I ran the Insert…Select… command to key in data into the final StudentCourse table. Depending upon the settings in the database, this will be a minimally logged operation, thereby giving you speed benefits.

Note that this is an overly simple example of the stored procedure, not employing transaction, error handling etc. and is meant to convey the concept of usage of comma separated values list in inserting multiple rows.

Emerging pattern:

If you look at this and carry it forward to more complicated use cases, then you’ll see a pattern emerging out. The pattern is:

1. Model the table variable after the final table that is supposed to receive the data.

2. Insert the most variable information in the table variable first.

3. Follow up the insertion with updation of table variable with information that is not changing much, like the StudentID in this example. It remains constant for all the courses inserted into the table variable.

4. If you need selective action within the table variable, make use of an integer type identity column. In this example, we did not require that.

5. The complexity of the procedure will depend upon the total columns in the final table. The more the columns, the more the number of update commands. There will also be a loop that you will have to manage in order to update the table variable with the right row form the table emitted by the splitter function.

In the next post I will cover how to insert multiple rows in SQL Server database using XML.

The sample code for this post consists of the web application and the powering database. Download it from:

Microsoft Reporting Services – The quirky uncle in the family

Key take away:

A Microsoft Reporting Services report needs a strongly typed dataset to work with, but it is generally overridden with an in-code dataset that is used to power the report. The report is sensitive to the name of the in-code dataset, and only works if provided with same name as what gets recorded in the XML innards of the report.

Read on:

Recently I got an opportunity to help a team shift their reports from Microsoft Reporting Services (MRS) to SQL Server reporting Services. Now I had left working with Microsoft Reporting Services back in 2010, when my team migrated all the reports to hosted SSRS environment, so I spent some time creating a simple yet effective proof of concept ASP.NET application working with a Microsoft Reporting Services report that I can show to the team in transition, on how import MRS reports in hosted SSRS environment. Nearly two-third of my time got spent in dealing with a quirk in Microsoft Reporting Services, which is providing the correct name of the dataset in the code, as the report wants it. I remembered this quirk from my days of working with Microsoft Reporting Services, but had forgotten the specifics of remedying the problem.

Microsoft Reporting Services is a port of SSRS that produces report(s) you can store in an ASP.NET application, along with the app contents and use the computing resources of the web application server to process data and serve the rendered view to the client. SSRS reports are bit more capable, easier to work with and can be offloaded to a dedicated report server, and thus computing resources (compute cycles, memory, bandwidth etc.) be saved on your primary web application server. Microsoft Reporting Services reports are a good choice when your reporting needs are simple, report generation is less frequent, and when on a shoe string budget. Otherwise, try to always opt for hosted SSRS environment.

clip_image001


Figure 1. Setup in Microsoft Reporting Services compared with hosted SQL Server Reporting Services (SSRS)

Microsoft Reporting Services requires a strongly typed dataset to work with, and process data from it. For SSRS the requirements are the same, but the process of making and dealing with a strongly typed dataset is easy and somewhat hidden. Both the types of reports use Report Definition Language (RDL), a format used to convey the report contents and related artifacts. RDL in turn is based on XML, which means that RDL is case sensitive and any change in the schema can potentially render your report unusable. SSRS reports inherit the extension of “.rdl” while Microsoft Reporting Services reports end with “.rdlc” extension, with “c” in “.rdlc” denoting client, i.e. processing at application server.

Now that we have understood a little background about the Microsoft Reporting Services, let’s understand the quirk.

Almost always, when developers deal with Microsoft Reporting Services reports, they make a report with a very simple strongly typed dataset; connect artifacts on the report with this simple dataset (tablix, matrix, charts etc.), but then override this dataset in their application code, containing data table(s) filled with data from the actual query that essentially produces the same columns, but different data qualitatively. I usually do this because strongly typed datasets cannot be de-bugged, and they are generally more time consuming to deal with than actual verbose code. Once the functionality to override the dataset is in place the strongly typed dataset can be removed entirely. But till the overriding facility is not in place, you have to retain the strongly typed dataset in place, otherwise the report won’t build.

Here I present a simple example consisting of three tables in a data model. The tables are self-explanatory in nature. I have filled the tables up with some junk data. I will use these to make a report in an ASP.NET Webforms website, and will show where one needs to be careful in producing code that over-rides the strongly typed dataset powering the report.

clip_image002


Figure 2 Data model

Use case: I might bind a tablix on an MRS report with a simple query of “Select FirstName, MiddleName, LastName, DateOfBirth from Person”. While the actual query that I want to run is “Select FirstName, MiddleName, LastName, DateOfBirth fromPerson inner join Address on Person.PersonID = Address.PersonID where Address.State = @State” to get me details of people living in a certain state. So the columns that need to go on report are the same, but the data that will now appear is different qualitatively.

clip_image004

Figure 3 Dataset name appears as “DataSet1” in MRS report powering my tablix.

The moment you insert a tablix, MRS is going to prompt to create a data source containing a dataset powering the tablix. Once you finish the operation, you will find a strongly typed dataset in the App_Code folder of your ASP.NET web application.

clip_image005


Figure 4 Dataset name as it appears in a strongly typed dataset.

You can double click the typed dataset and get the name of the strongly typed dataset by clicking in the blue section and bringing up the properties. The name came “DatabaseDataSet” came up by default. You can change that, but what matters is what is getting registered in the report.

clip_image007


Figure 5 The name of the dataset as it appears in XML that makes up the report is of most importance.

Now here’s the code that you have to produce very carefully.

Make sure that when you are passing the report data source object to the report, it bears the same name as that of the dataset bound to the report, and more appropriately as found in the XML of the report. It doesn’t matter what is the name of the strongly bound dataset.

To see the name as it appears in the report’s innards, open with the inbuilt XML editor or just open it in Notepad and look for the entry with the name.

clip_image009

Figure 6 The name of the dataset that you provide in a report data source should be the same as in report's innards.

This is quirk is only applicable on the name of the dataset that you need to provide. The name of the data source can be anything, and so is the name of the data table that carries the actual data in the dataset.

The sample code consists of two ASP.NET websites. One consists of a strongly typed dataset, while the other one does not consists of it. Both the websites have the same report being powered by an in-code dataset. The code was made in Visual Studio 2012 and targets .NET Framework 4.5. The code can be downloaded from:

SignalR Sample Application – Hello World

In my last post, I described the simplicity that SignalR brings to table when we want to include real time asynchronous communication between server and client(s) in our application. In this post I will make a simple application, the proverbial ‘Hello World’ kind of application to introduce the basic concepts of this new library.

The following are the pre-requisites for the application:

1. Visual Studio 2012

2. .NET Framework 4.5

3. ASP.NET and Web Tools 2012.2

The best thing about the web tools update 2012.2 is the included template that makes adding SignalR capabilities to your project amazingly easy. Our website will be based on ASP.NET Web forms and will use JavaScript client, which comes in the form of a jQuery plugin. So let’s start.

1. Fire up your Visual Studio and make a new empty ASP.NET Web forms web site.

2. Right click on the website and add a SignalR Hub class and provide “HelloWorld” as the name for the hub class. This will add the following items in the website:

a) App_Code folder – which will house our hub class and the App_Start folder which contains the RegisterHubs.cs file, housing the code that maps the hubs available at application startup.

b) Scripts folder which houses all the JavaScript files, including the bundled jQuery library and the JavaScript client based upon the jQuery library.

c) Bin folder housing all the necessary assemblies that co-ordinate things on the server side. This also contains the JSON serializer Json.NET.

d) packages.config which lists all the external dependencies.

Now we will have to change this setup a little bit in order to make it work in a web forms website. Remove the App_Start folder and the containing RegisterHubs.cs file from it. The App_Start folder is something that the MVC website can use to execute code at application startup. Web form website uses Global.asax to do just the same. I believe this a template error, and will be corrected out in future releases.

Delete App_Start folder and it's contents


3. Add a Global.asax file to the solution. The HTML portion of your Global.asax file should look like this:

<%@ Application Language="C#" Inherits="Global" CodeBehind="~/App_Code/Global.asax.cs"%>
 
<script runat="server">
</script>


and the code behind portion should look like this:

using System;
using System.Collections.Generic;
using System.Linq;
using System.Web;
using System.Web.Routing;
using Microsoft.AspNet.SignalR;
 
/// <summary>
/// Summary description for Global
/// </summary>
public class Global:System.Web.HttpApplication
{
    void Application_Start(object sender, EventArgs e)
    {
        // Code that runs on application startup
        RouteTable.Routes.MapHubs();
    }
 

Explanation of code:

Note that we are required to include System.Web.Routing and Microsoft.Aspnet.SignalR namespaces and make the Global class inherit from System.Web.HttpApplication class.The purpose of having RouteTable.Routes.MapHubs is to map the hubs available to the client to a special default address: /signalr/hubs. If you want to configure the availability of hubs to a special address then you will have to provide custom address in the MapHubs as a string parameter. e.g. RouteTable.Routes.MapHubs(“~/signalr2”).

4. Now head over to the hub class and add the following code:

using System;
using System.Collections.Generic;
using System.Linq;
using System.Web;
using Microsoft.AspNet.SignalR.Hubs;
 
public class HelloWorld : Hub
{
    public void Hello()
    {
        Clients.All.hello();
    }        
}


Explanation of code:

The main thing to notice here is the inclusion of the namespace Microsoft.Aspnet.SignalR.Hubs and derivation of the hub class HelloWorld from parent class Hub. From the perspective of the client and server model, this is the class that aptly serves as a hub and will receive all the communication from the client(s) and further the same to other client(s) or take some action on the server side. In code, we are declaring that there is a server side method called “Hello” which when executed will execute a method called “hello”, available to all the clients.

5. Now add an HTML page and add the following code in it.

<!DOCTYPE html>
<html xmlns="http://www.w3.org/1999/xhtml">
<head>
    <title>Hello World! with SignalR</title>
    <script src="Scripts/jquery-1.7.1.min.js"></script>
    <script src="Scripts/jquery.signalR-1.0.0-alpha1.min.js"></script>
    <script src="/signalr/hubs" type="text/javascript"></script>
    <script type="text/javascript">
        $(document).ready(function () {
 
            //defining hub which will have client and server side methods defined.
            var hub = $.connection.helloWorld;
 
            //defining what the client side "hello" method should do when called.
            //by the server side code.
            hub.client.hello = function () {
                $('#AddText').append('Hello World!<br />');
            }
 
            //starting the hub and specifying what should server side code should be
            //called when a certain client side event occur.
            $.connection.hub.start().done(function () {
                $('#SubmitButton').click(function () {
                    hub.server.hello();
                });
            });
        });
    </script>
</head>
<body>
    <div id="AddText"></div>
    <input type="button" id="SubmitButton" value="Say Hello" />
</body>
</html>


Explanation of code:

Here we reference all the necessary JavaScript libraries among which are the jQuery library and SignalR JavaScript client based on jQuery. There is one special JavaScript reference “/signalr/hubs” which is the JavaScript that is dynamically generated at client side and referenced by DOM at runtime. The body of the HTML document consists of a div element bearing id “AddText” to which we will add text “Hello World!” each time the button “Say Hello” is pressed. The jQuery code for this example is very simple. In it we declare the name of the hub class. Note that we are using camel casing as per JavaScript coding conventions to refer to our server side hub class. Thus “helloWorld” at client side is “HelloWorld” at server side. We then define that the client side “hello” method which is actually adding the text “Hello World!” and a line break to the div element “AddText”. We then start the connection and when done, observes the click event of the “Say Hello” button. When the click event happens on the client side, we execute the server side method “Hello” of the hub class, which in turns executes the “hello” method available at all the clients. This adds text to the div element at all clients.

Speaking diagrammatically, this is what we are aiming to do:

Client-Server Model


In the end the code hierarchy should look like in the following image with all the code in the right place.

Code hierarchy


6. As the last step start debug and run the website in IIS Express. Open the website in multiple different browsers and press the “Say Hello” button. It will add text “Hello World!” in all the browsers simultaneously in real time.

Multiple browsers


Website running in IE9 and Firefox, receiving instructions from server in real time.

The code example presented here has been deliberately kept simple to prime the reader of the basic concepts of this new library.

In a nut shell we achieved:

1. Real time communication between server and client(s).

2. Auto negotiation of protocol (WebSocket, forever frames, long polling etc.) between the client(s) and server.

3. Simple, unified programming interface built upon C# (server side) and jQuery (client side in ASP.NET).

Download code:

SignalR sample application download


In the next post I will demonstrate a more involved example, utilizing jQuery UI. Stay Tuned.